Drawing noses challenges many artists. They often struggle with proportions and end up creating flat, cartoon-like features that lack the depth needed for realistic portraits.
Artists can learn simple techniques for how to draw a nose that looks genuinely lifelike. With the right approach, creating a nose with proper dimensions and character becomes achievable for anyone willing to practice.
This guide presents step-by-step methods for how to draw a nose from multiple angles. Readers will find shading techniques that create dimension, common mistakes to avoid, and tips for capturing unique features.
The skills gained will enhance not just nose drawings but overall portrait abilities too. Artists should start practicing today to see immediate improvement in their artwork.
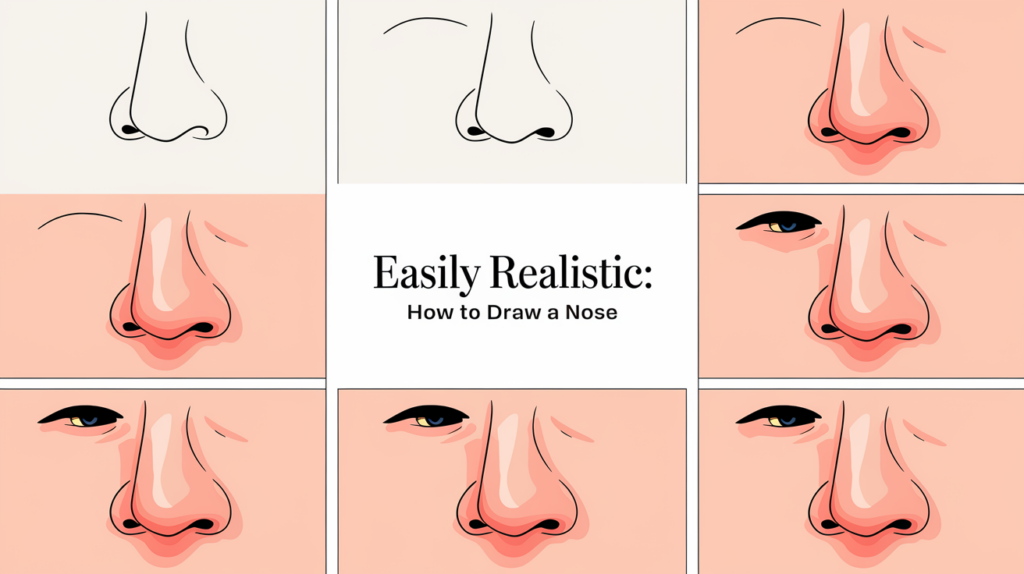
How to Sketch a Realistic Nose: Tips & Techniques
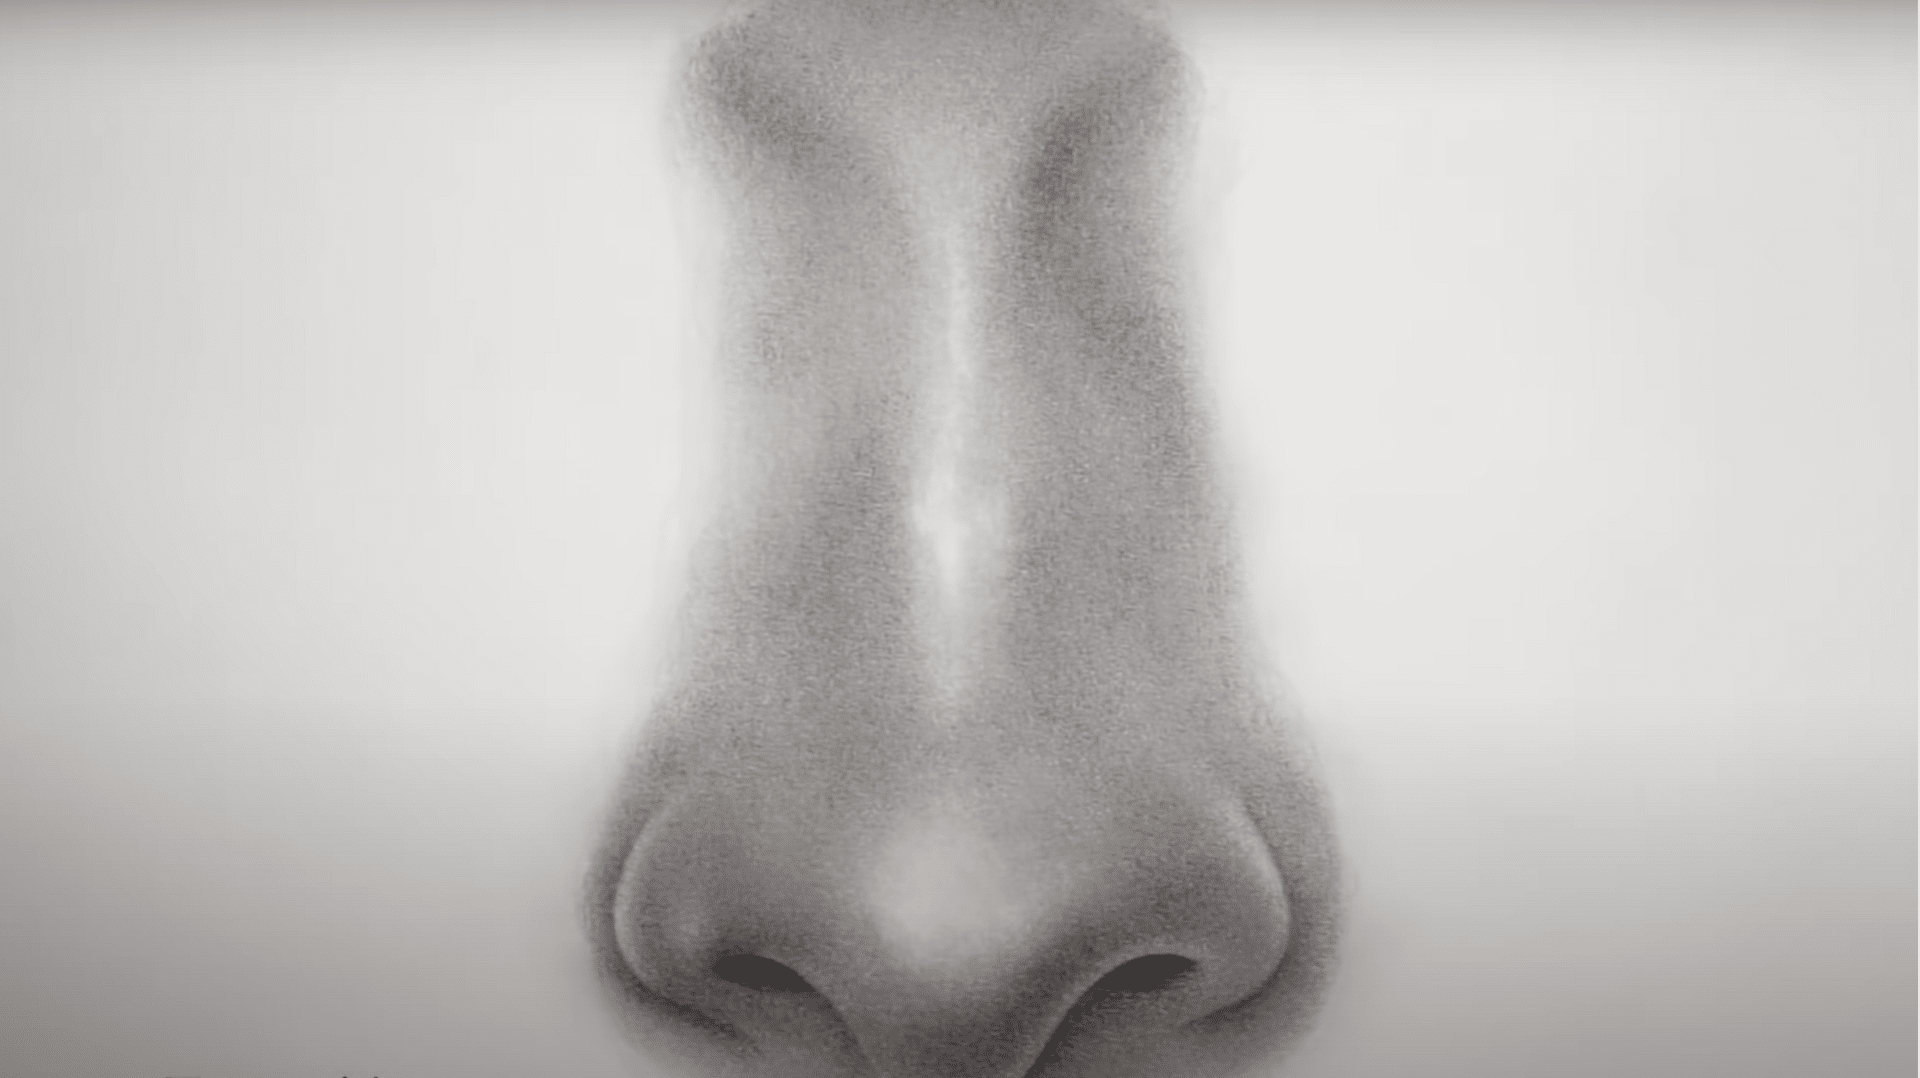
The nose is a central feature of the human face that many artists find tricky to capture. Its three-dimensional quality requires careful attention to shadows and highlights.
Learning to sketch a realistic nose opens the door to creating more lifelike portraits. These techniques help artists master this important facial feature with practice and patience.
1. Simple outlines: Artists start with basic shapes to create a nose framework. They use a small circle for the tip and a triangle for the bridge, which helps establish proper proportions from the beginning.
2. Light guidelines: Drawing faint lines helps artists map the nose structure. These lines mark where shadows will fall and show the relationship between the nose and other facial features.
3. Correct proportions: Most noses measure about one-third of the face length. Artists who keep this ratio in mind create more balanced facial drawings that look natural to viewers.
4. Shadow placement: Shading makes noses look three-dimensional. Artists add darker tones under the tip and along one side to create depth that brings the drawing to life.
5. Subtle highlights: A small white space on the nose bridge creates the illusion of light hitting the skin. This tiny detail makes the entire nose appear more realistic to anyone looking at the drawing.
Steps on How to Draw a Nose from Front Angle
Drawing a realistic nose might feel intimidating at first, but once broken down into easy-to-follow steps, the process becomes surprisingly approachable.
The following steps walk through the front view of a nose with a warm, encouraging tone, which is perfect for beginners or anyone looking to refine their portrait skills.
Step 1: Begin with the Basic Framework
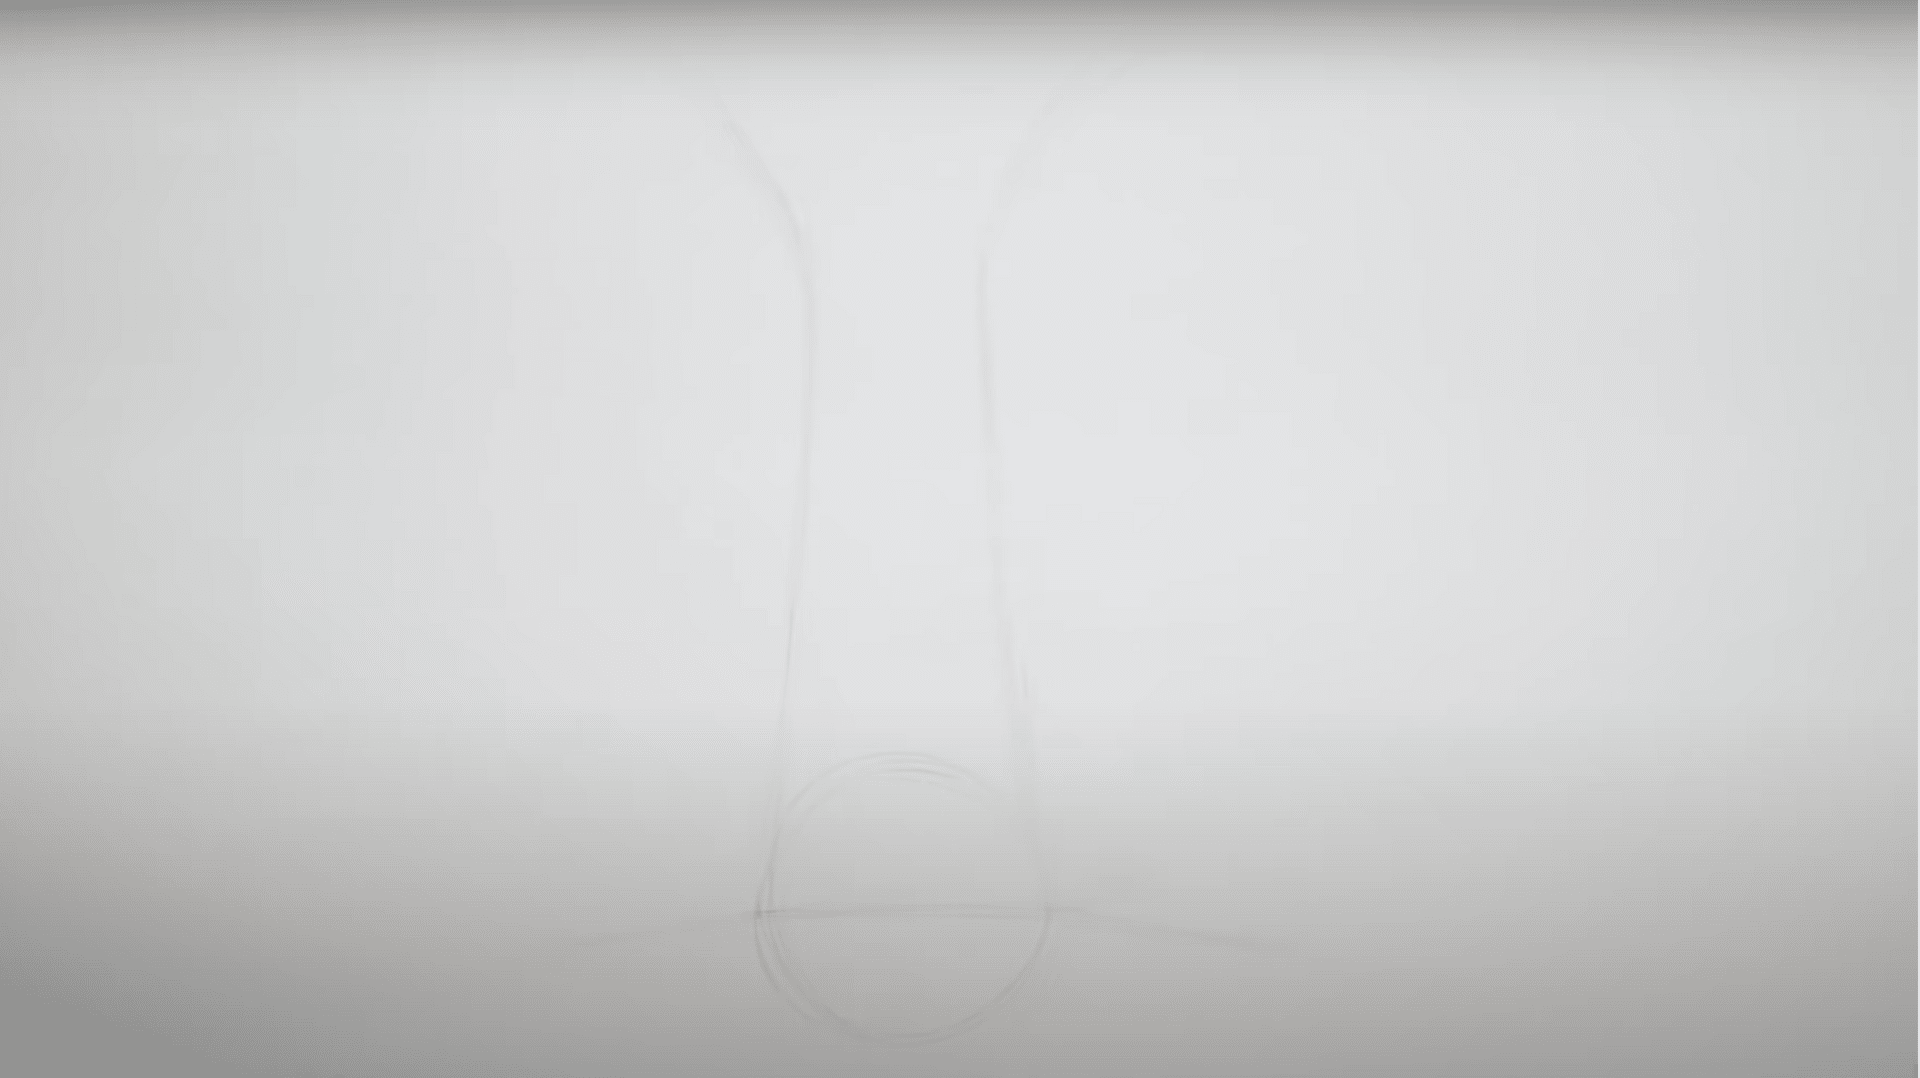
Start by sketching a circle where the tip of the nose will be. From the top edges of this circle, draw two slightly curved lines extending upward to represent the bridge of the nose transitioning into the brow bone.
Keep your lines soft and light, as they serve as loose guides rather than final outlines.
Step 2: Define the Horizontal and Vertical Proportions
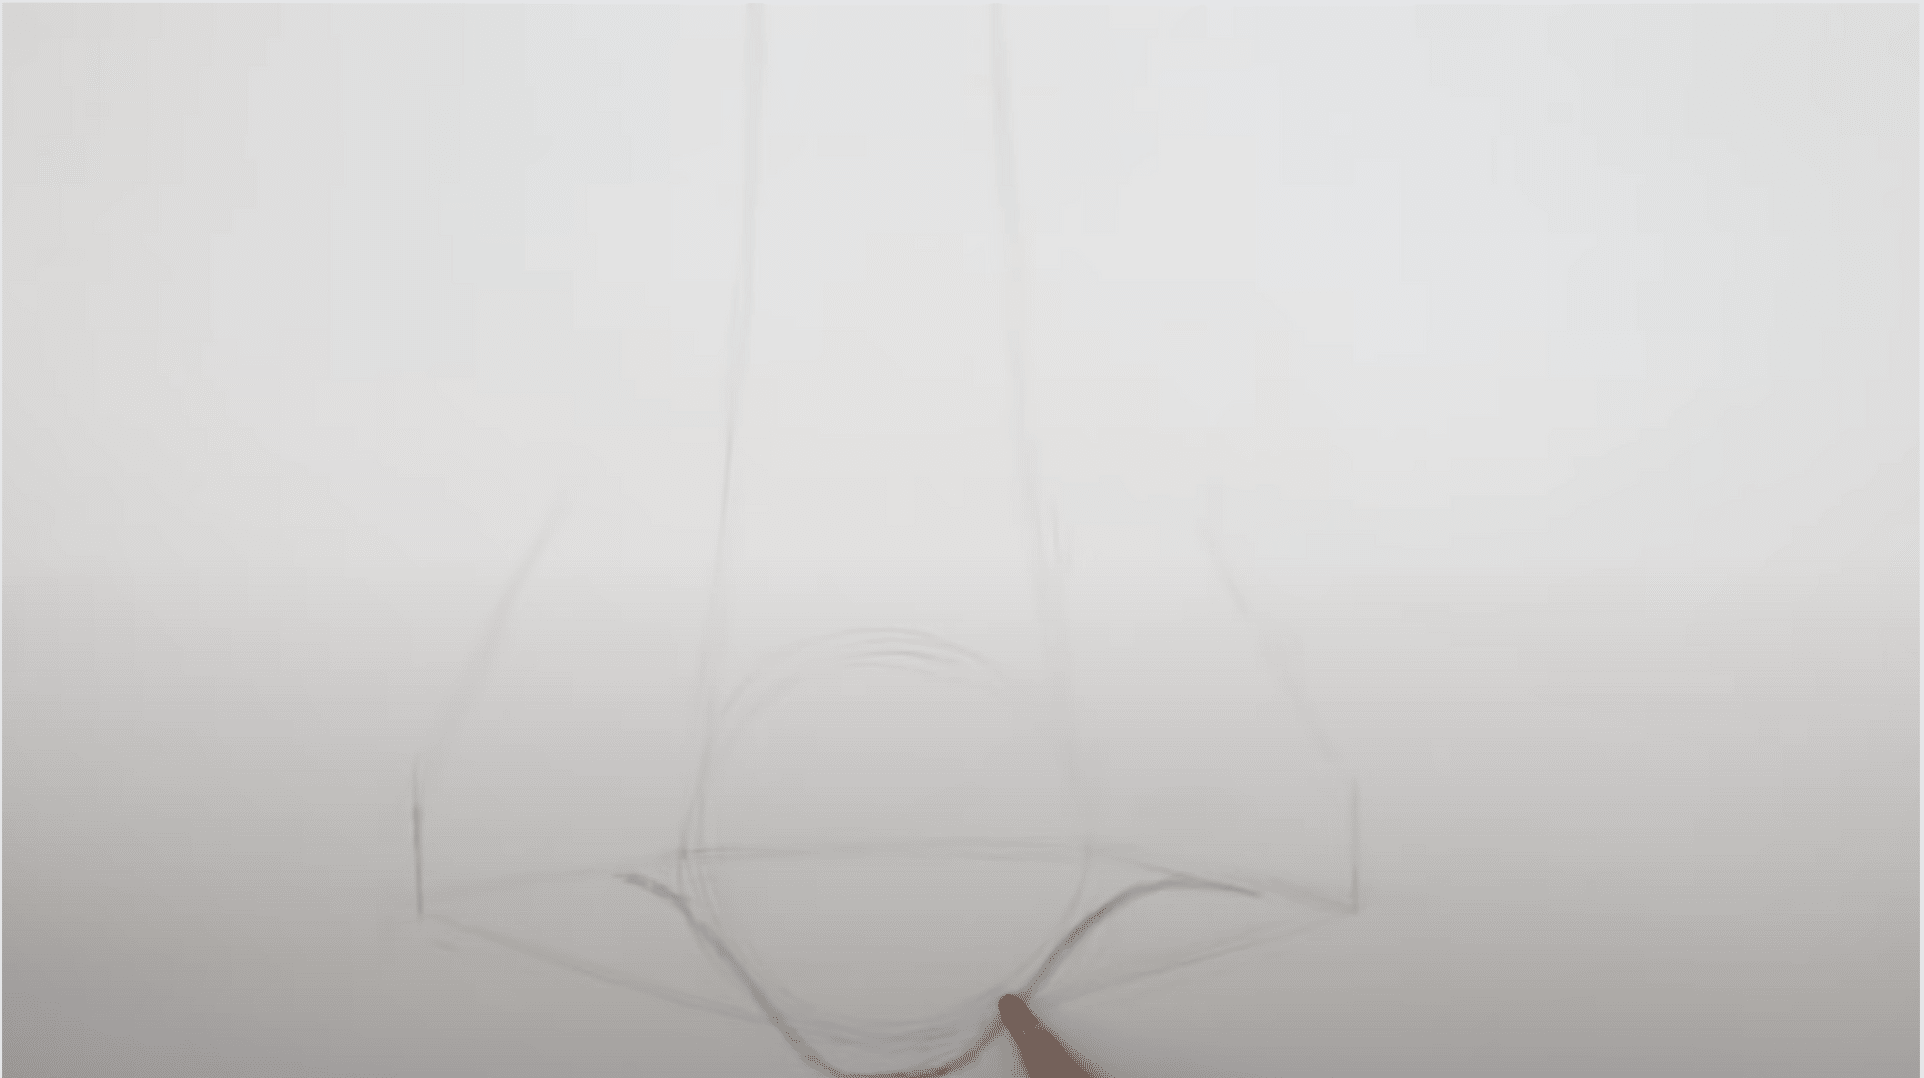
Draw a horizontal line through the center of the circle and extend it outward. Slightly angle the ends downward, where these will act as guides for nostril placement.
Then, draw two short vertical lines at these outer ends and connect them with a curved line at the base to begin forming the nostrils.
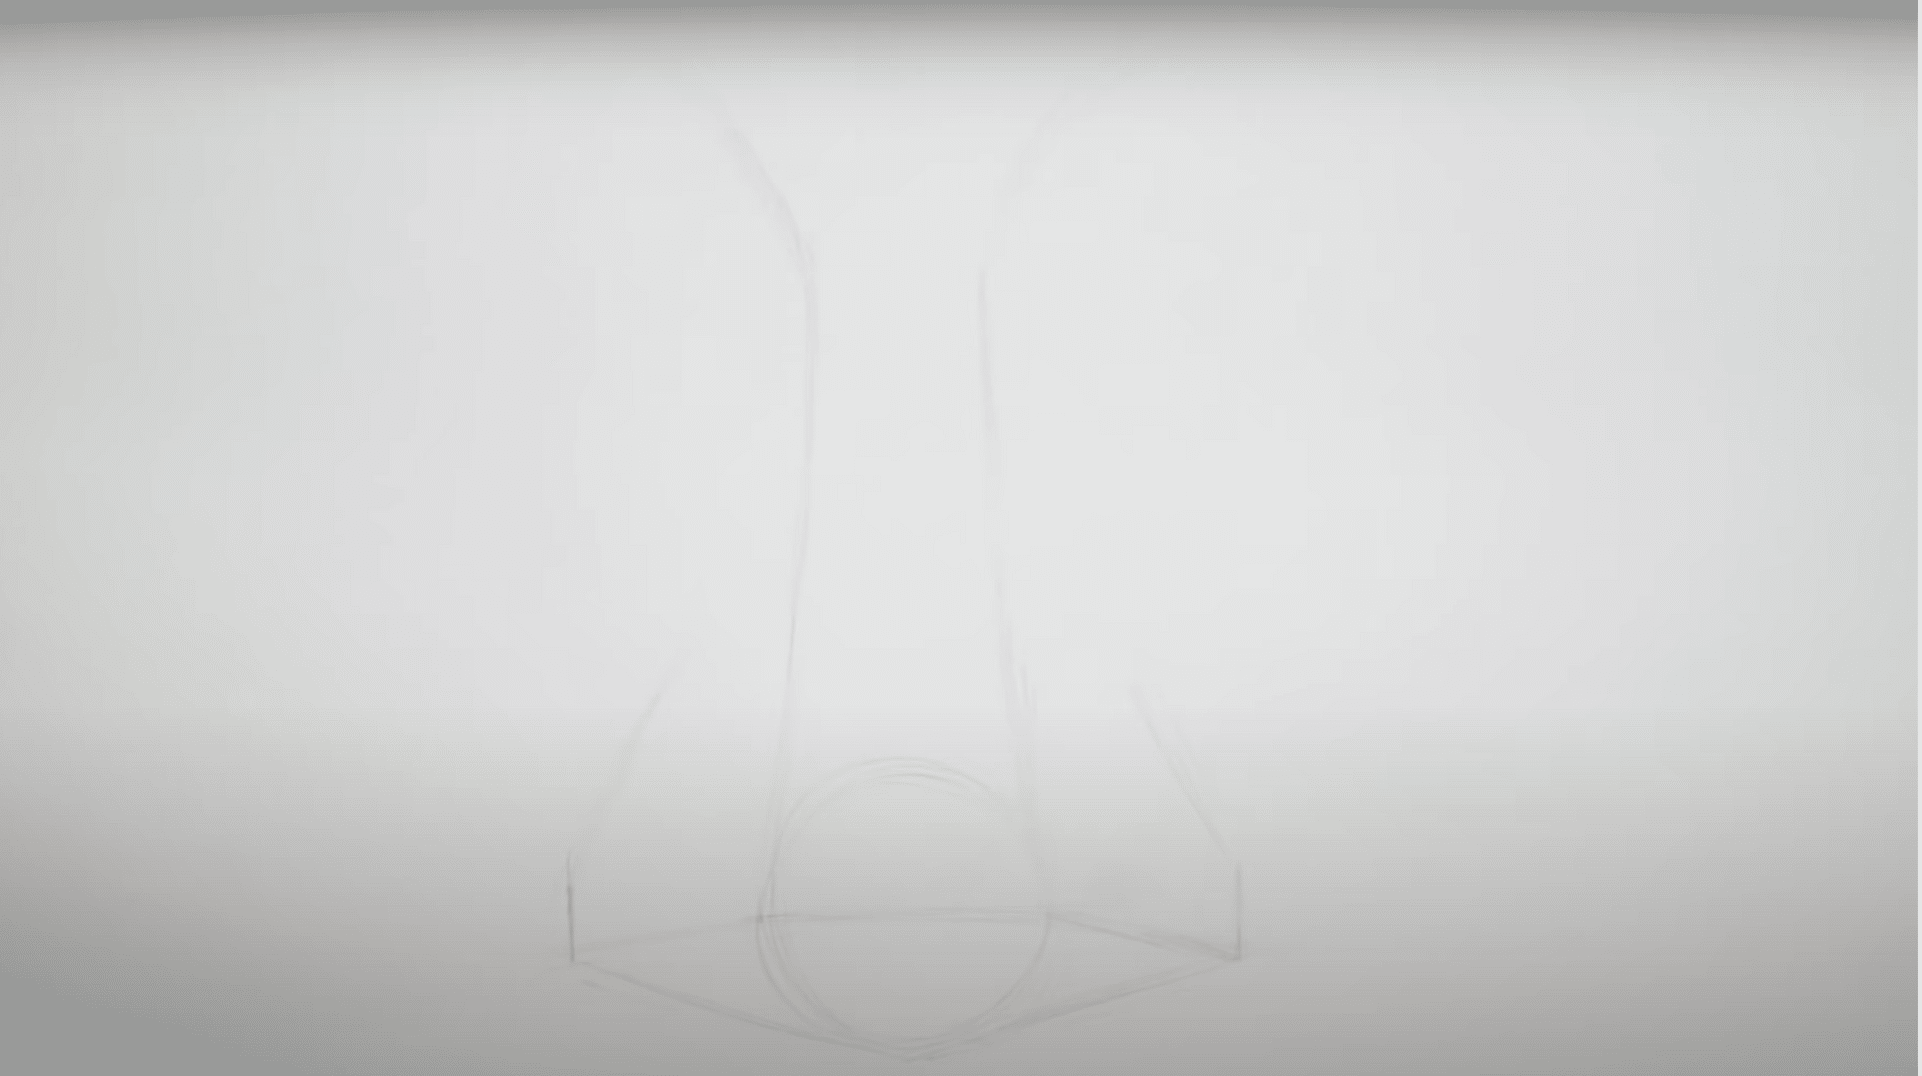
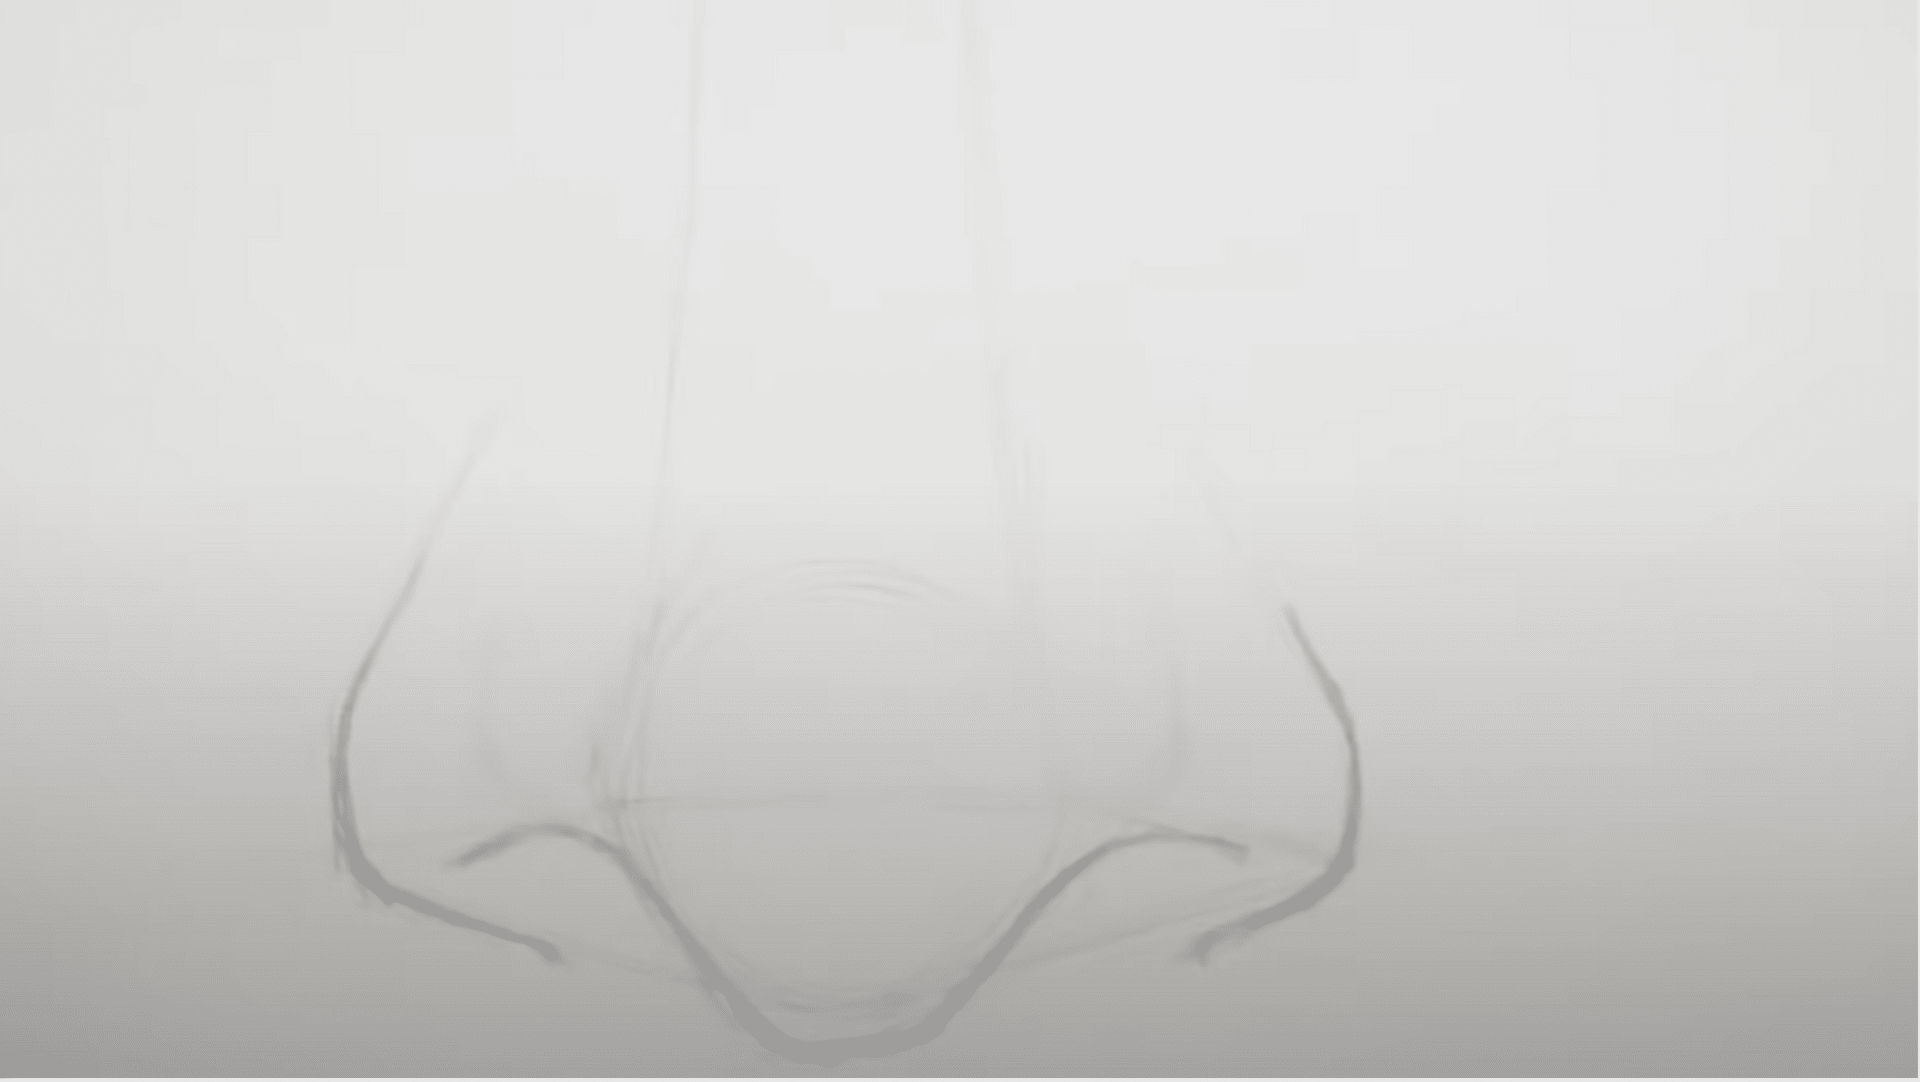
Step 3: Add Guiding Lines for Nose Shape
To bring more structure to your sketch, gently add strokes that guide the nostrils and nose wings. These angled lines also help in refining the bridge’s connection to the base.
- From the outer tips of the nostril guides, draw two diagonal lines slanting inward toward the bridge.
- Visualize or sketch a soft triangle that defines overall nose width and symmetry.
- Adjust curves around the nostril wings to fit different styles like, sharp for angular noses, rounder for softer shapes.
Step 4: Refine with Custom Features
Use the guidelines to develop unique nose shapes. For example, a larger circle creates a rounder, bulbous nose, while narrowing the base creates a slimmer look.
Shift the horizontal line higher for a lifted appearance. This is the stage where you can experiment and shape the nose according to different styles or references.
Step 5: Anchor the Nose with Facial Landmarks
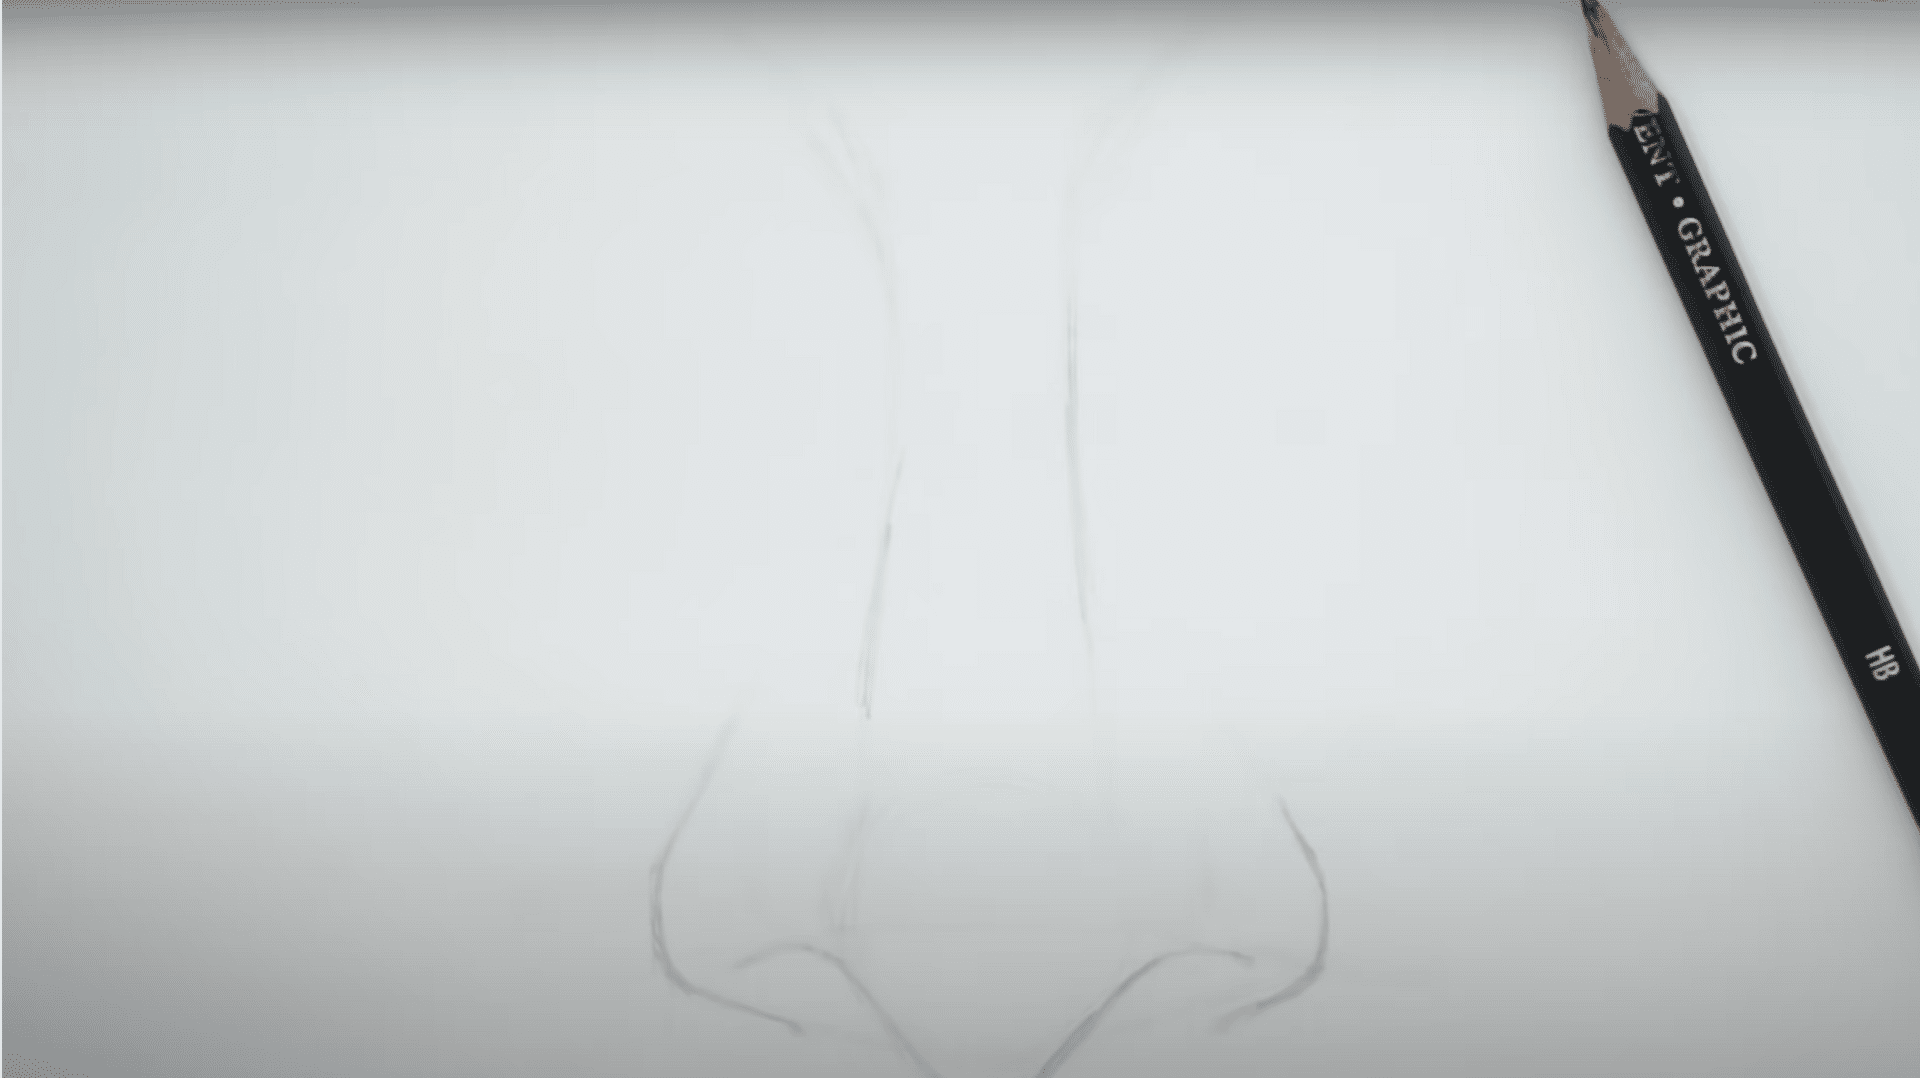
To maintain symmetry, draw a vertical line down the center of the face. Use the inner corners of the eyes to draw two vertical lines downward, where these mark the nose’s width boundaries.
For the nose’s length, try either of these methods: measure three iris lengths down from the eye or draw a triangle with equal-length sides that reaches from each outer eye corner down to the tip.
Step 6: Shade with Soft and Layered Strokes
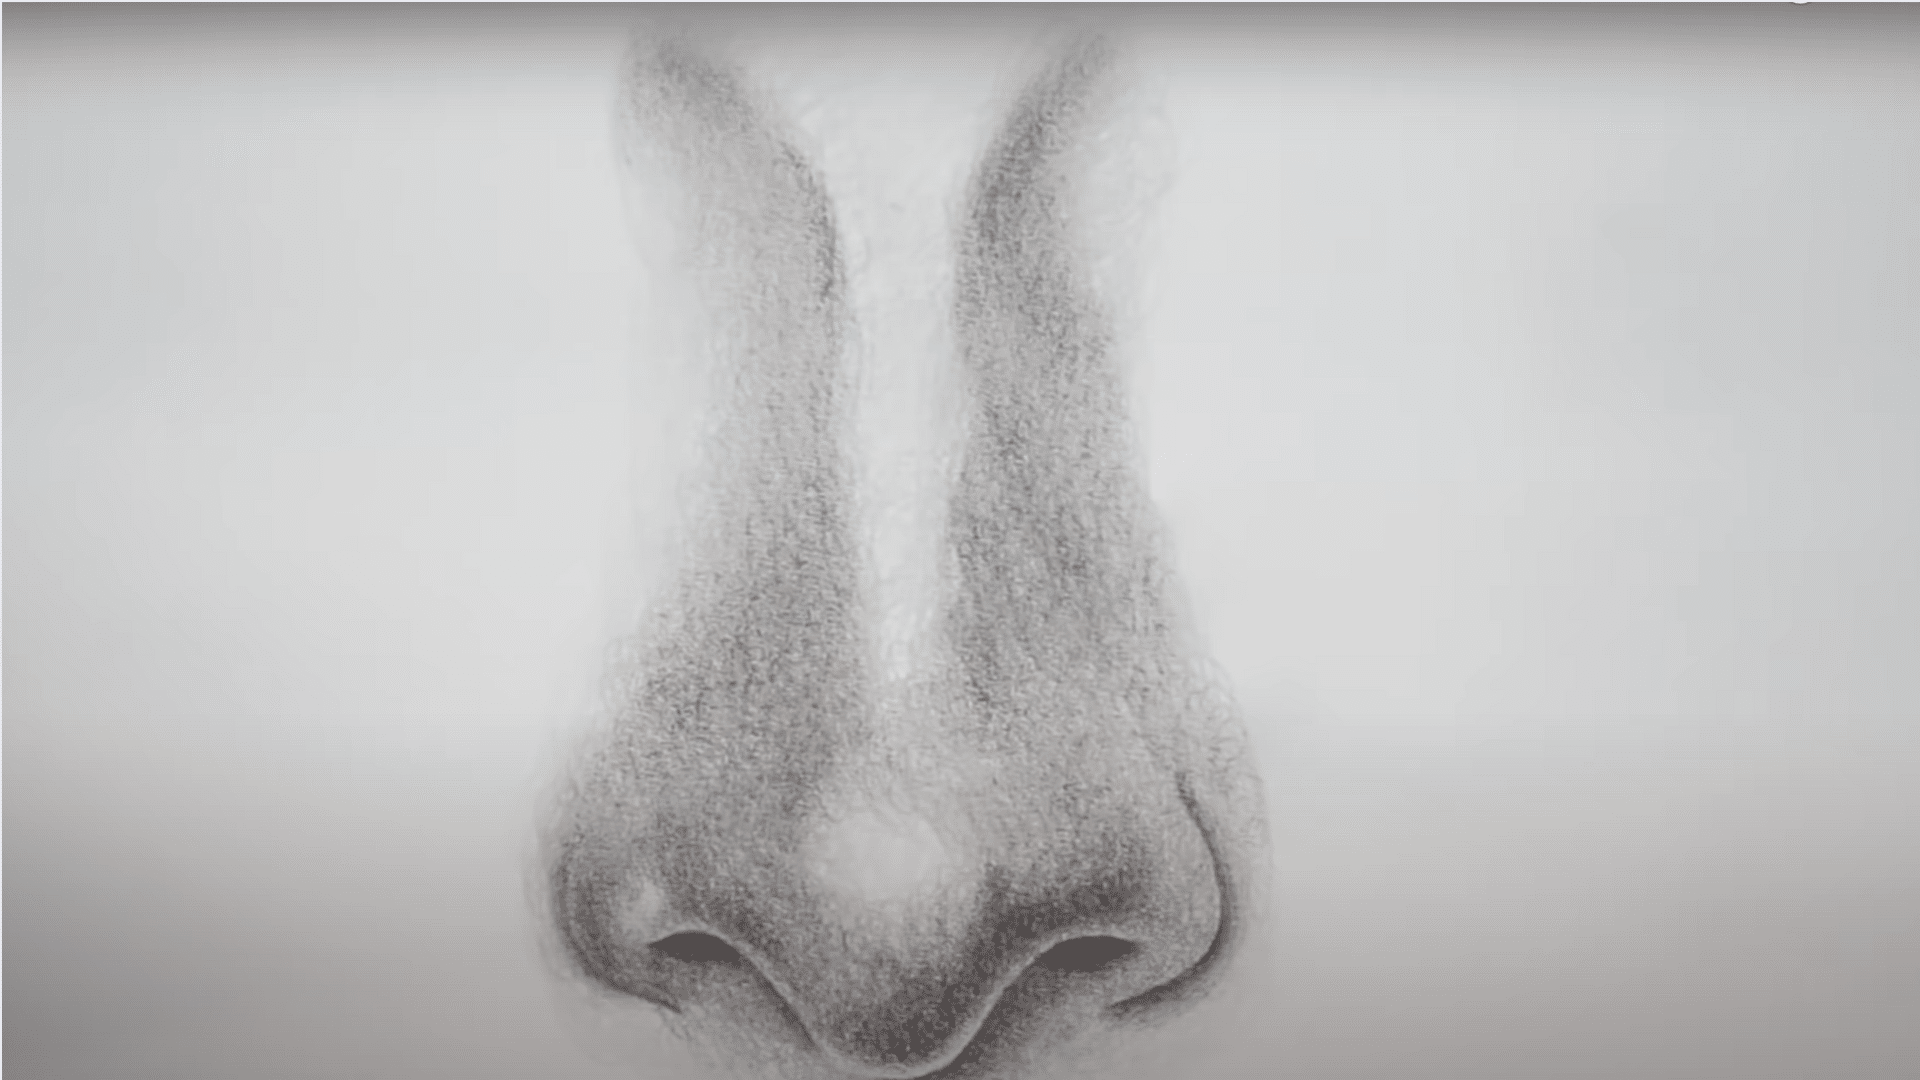
Shading brings your drawing to life, so take your time and build tone gradually.
- Begin with an HB pencil using light, circular motions (circlism) to shade the bridge and tip.
- Avoid using bold outlines. Instead, define edges softly with shadow.
- Use a 2B or 4B pencil to darken the nostrils, the sides of the nose, and the underside, leaving the tip subtly highlighted.
- Pay attention to your light source and shade accordingly, creating depth through gentle layering rather than pressure.
Step 7: Blend and Highlight for Realism
Use a tissue or blending stump to gently soften the graphite, always blending in sections and steering clear of dragging dark tones into light areas.
Clean up blotches using a kneaded eraser shaped into a fine tip. To add brightness, gently lift the graphite in highlight areas using dabs or swipes.
Build shadows gradually, adjusting contrast by layering darker midtones and refining the definition around the nostrils and tip.
Steps to Draw a Nose from The Side Angle Effectively
Drawing a realistic side-view nose may feel intimidating at first, but with gentle guidance and some creativity, the process becomes surprisingly fun.
The refined instruction walks the artist through each step, from basic shapes to smooth shading. Every stroke brings the drawing closer to life.
Step 1: Begin with the Foundation
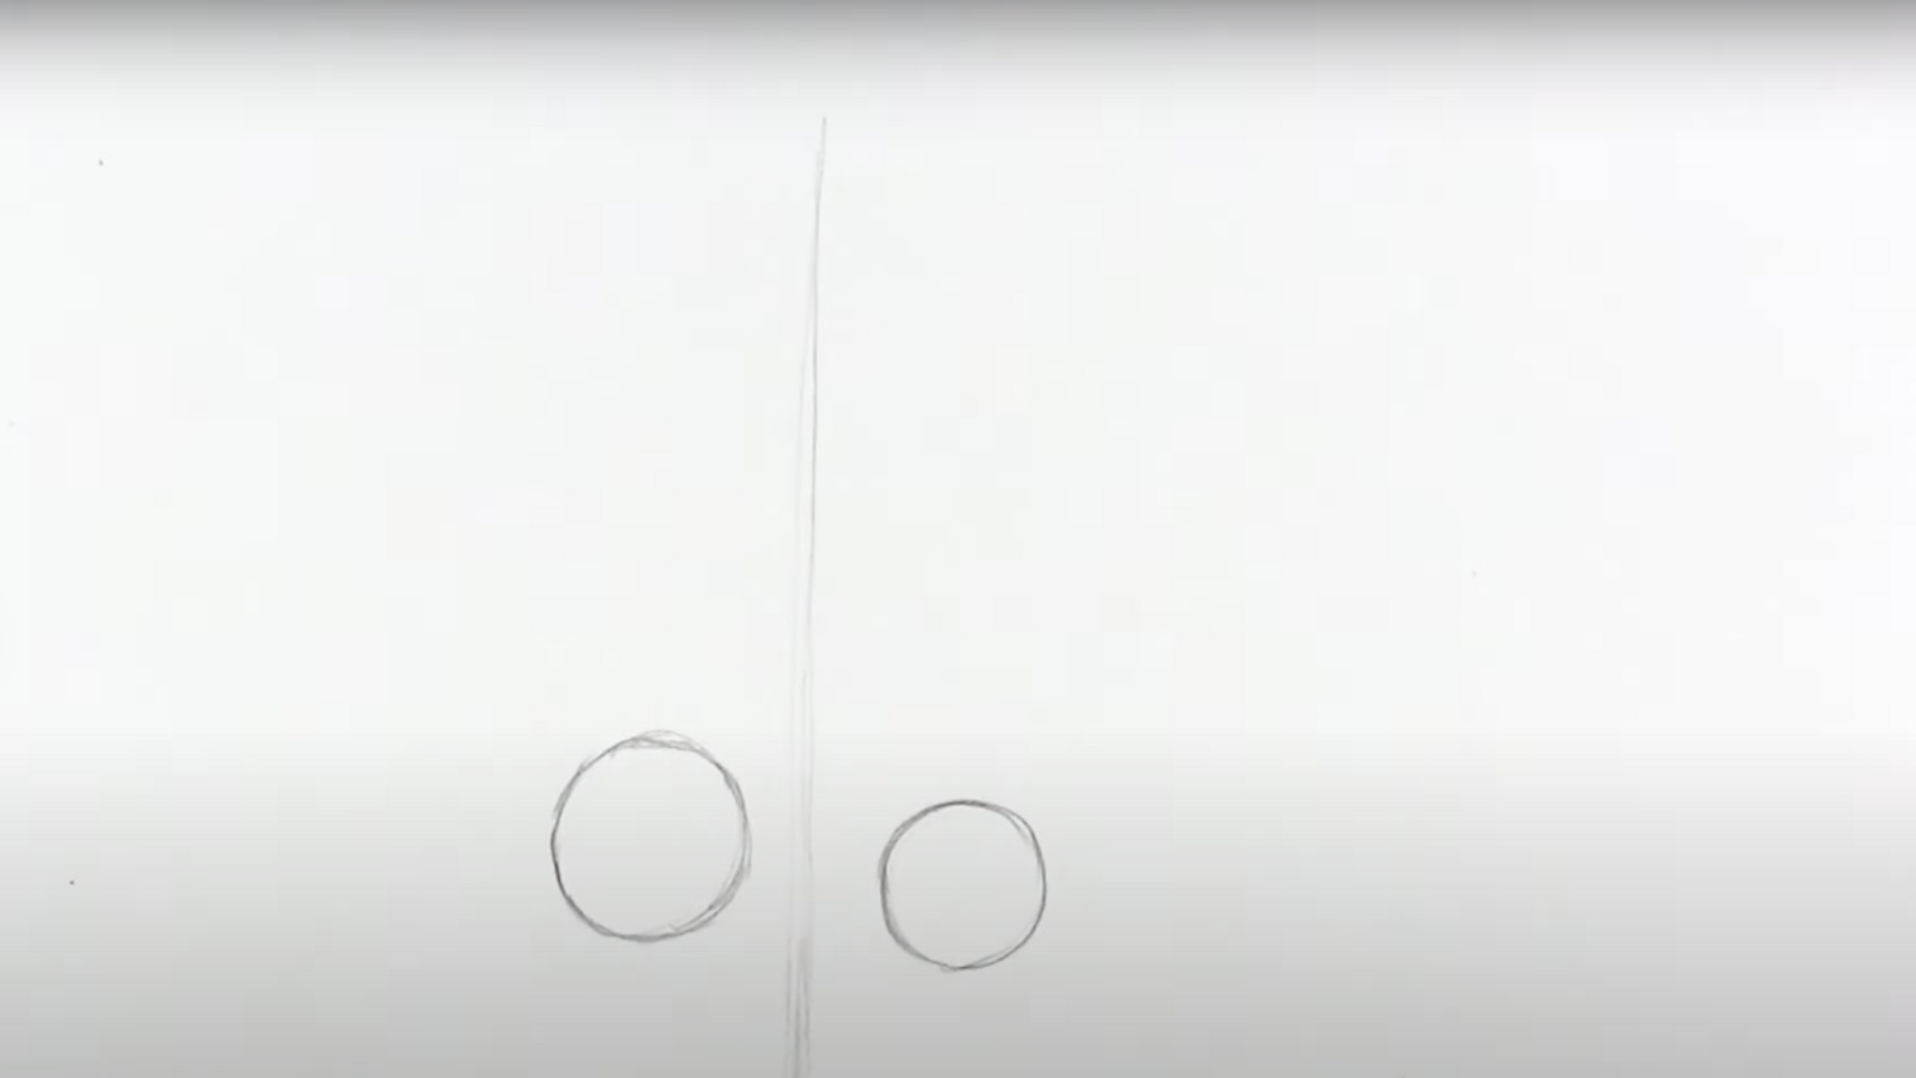
The artist starts by drawing two circles side by side with a small space in between. These circles represent the tip and the base. A wider gap will give the nose more protrusion.
Then, a vertical line is sketched down the center to serve as a placement guide for the bridge and upper lip.
Step 2: Build the Tip and Bridge
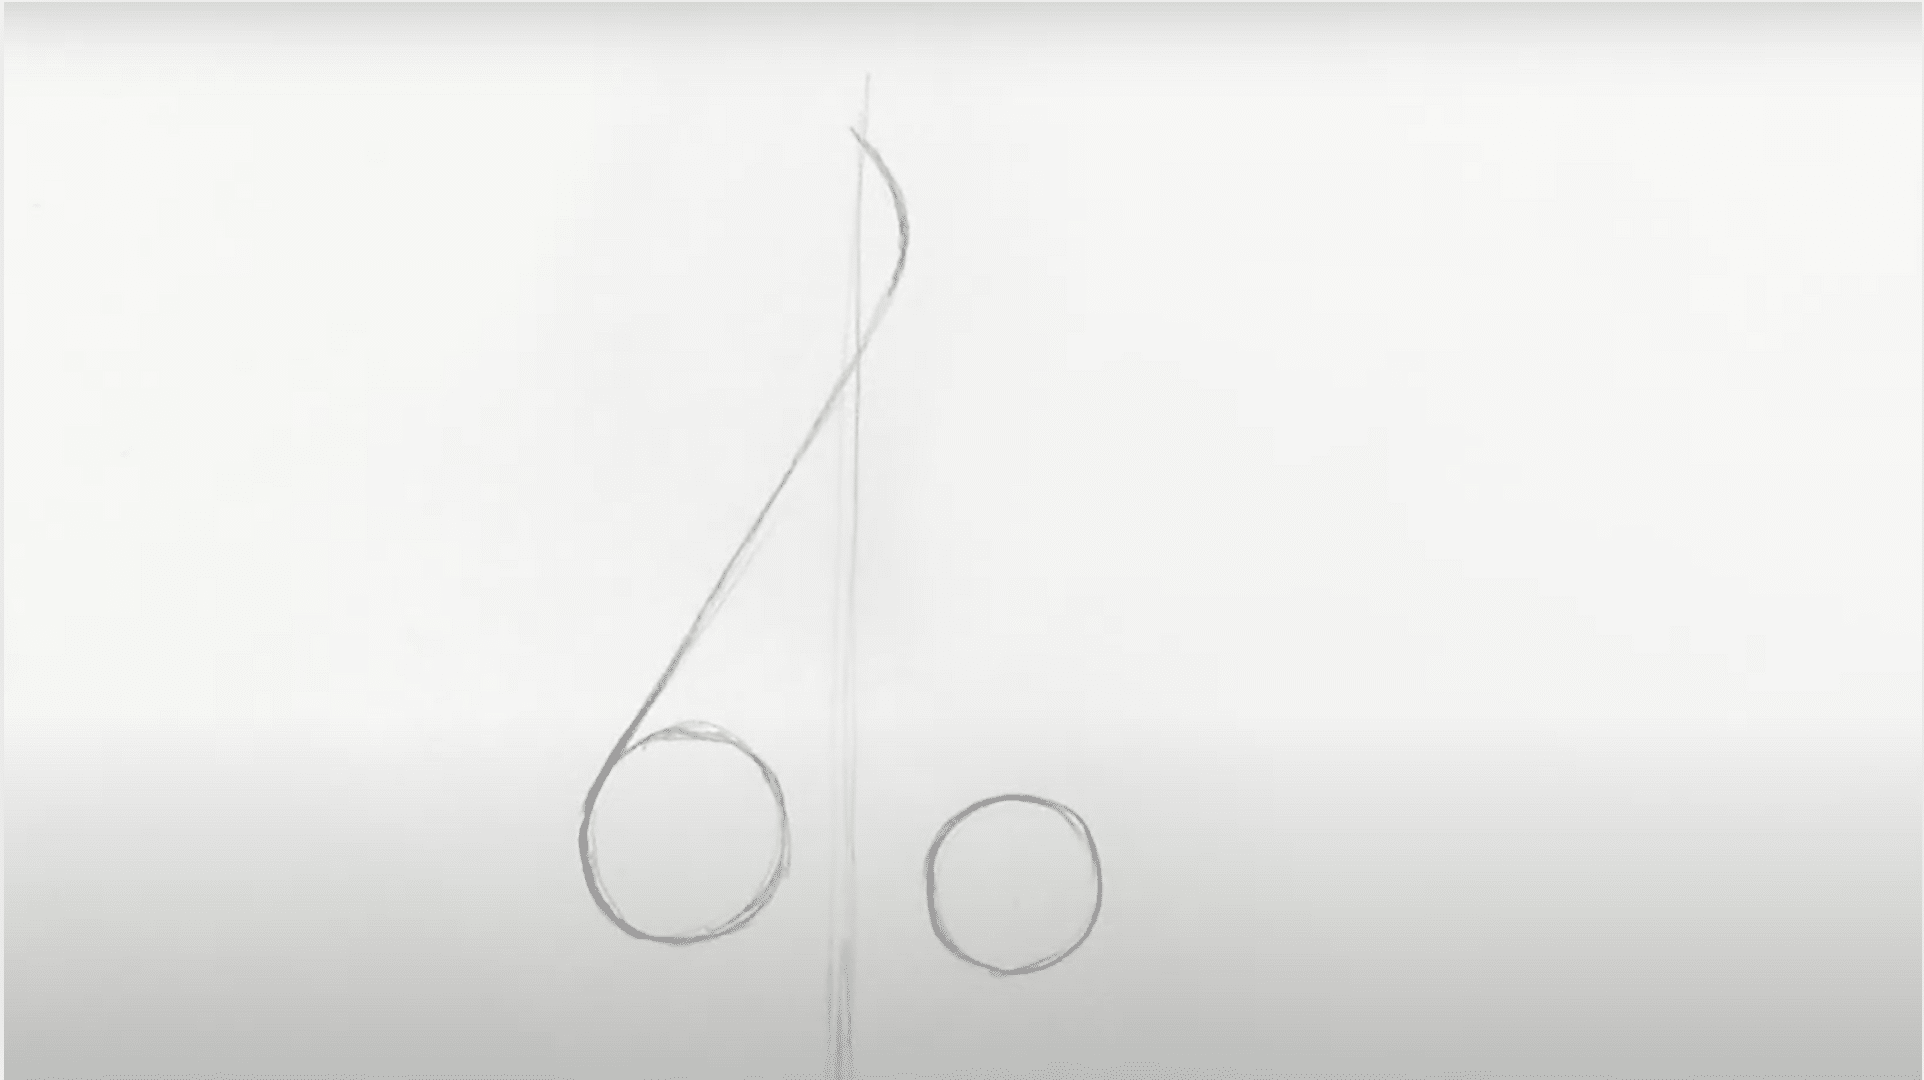
Beginning at the tip, the artist traces around the first circle and curves upward to form the bridge.
The stroke extends slightly past the vertical guideline without reaching beyond the far circle. For added realism, the bridge can feature a subtle bump or inward curve.
Step 3: Extend the Brow and Form the Upper Lip
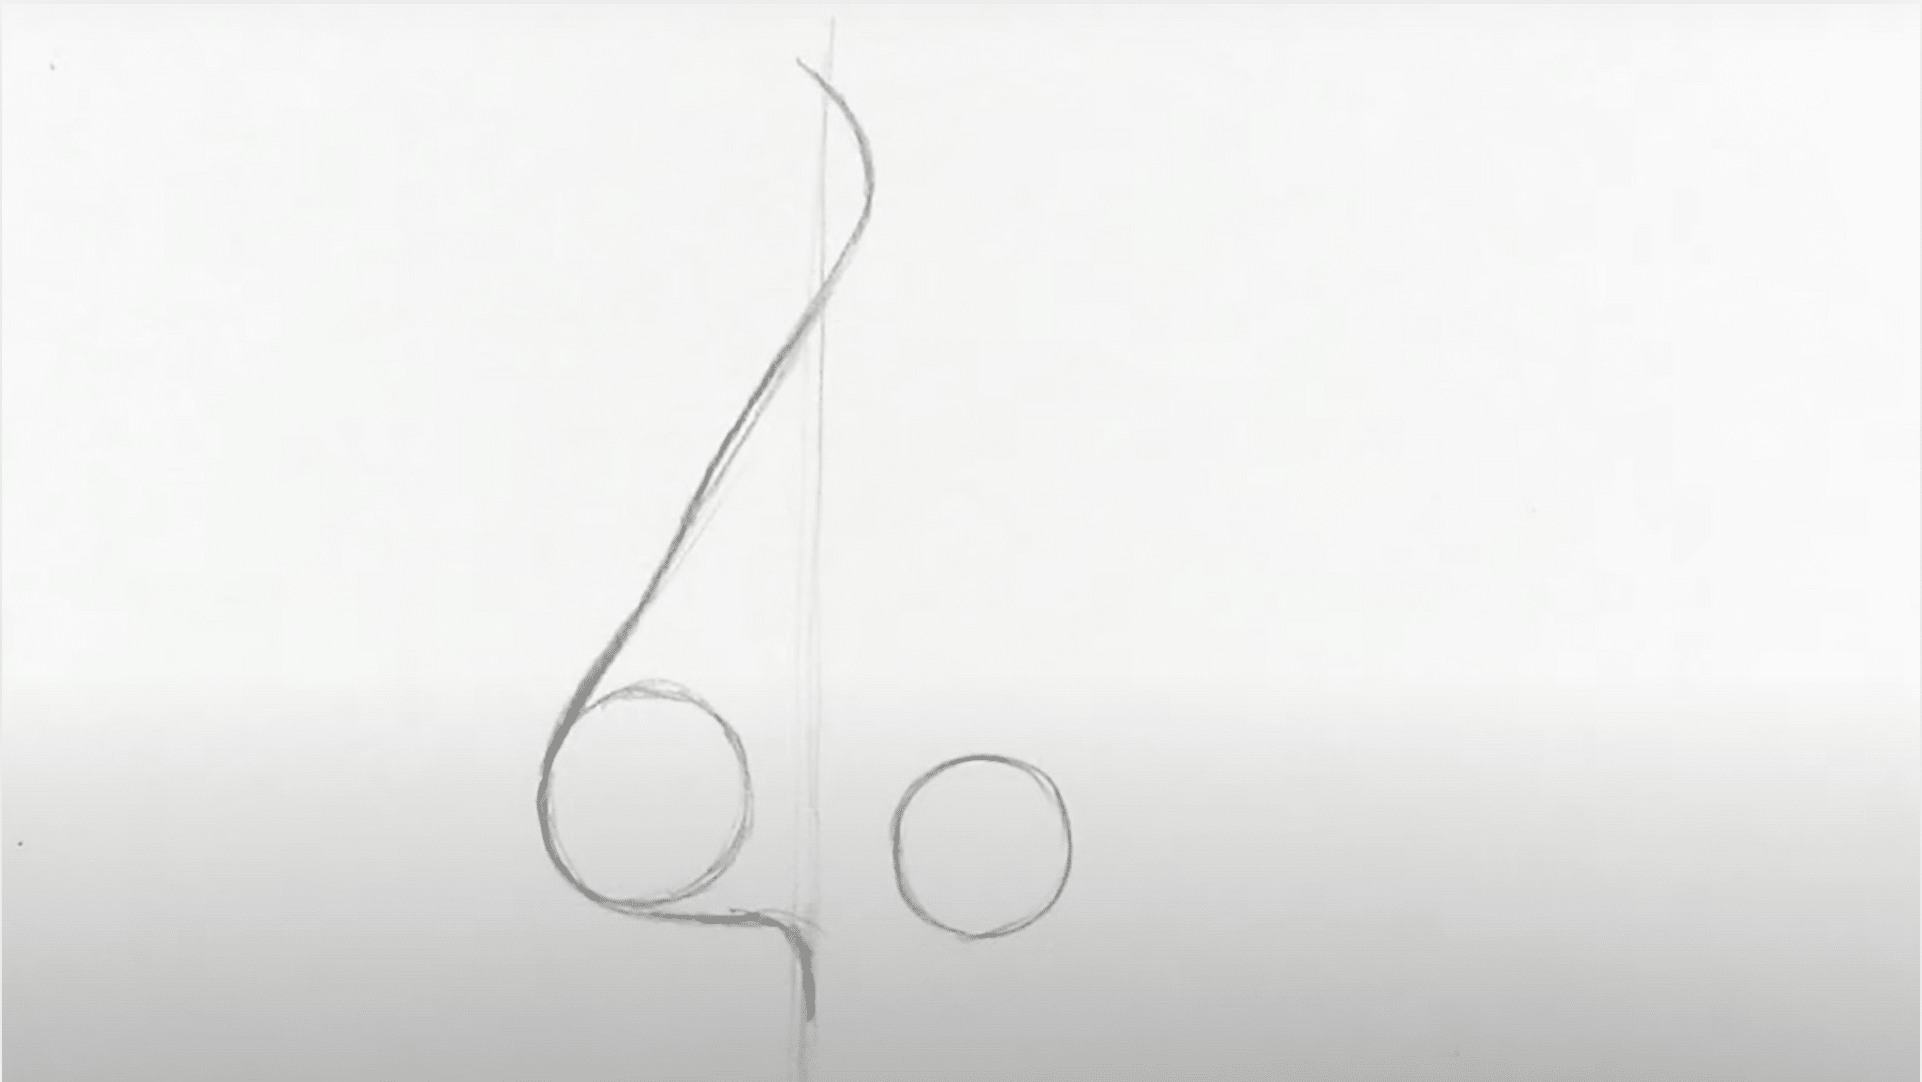
After forming the bridge, the artist continues the stroke to shape the brow area. This upward curve adds a natural transition into the forehead and gives the nose a defined structure.
The next part of the line moves downward, tracing the bottom edge of the first circle and guiding the shape toward the upper lip.
To refine this area:
- Follow the curve downward until it meets the vertical guideline.
- Keep the stroke soft and fluid for a realistic contour into the lip area.
Step 4: Add the Nostril and Wing
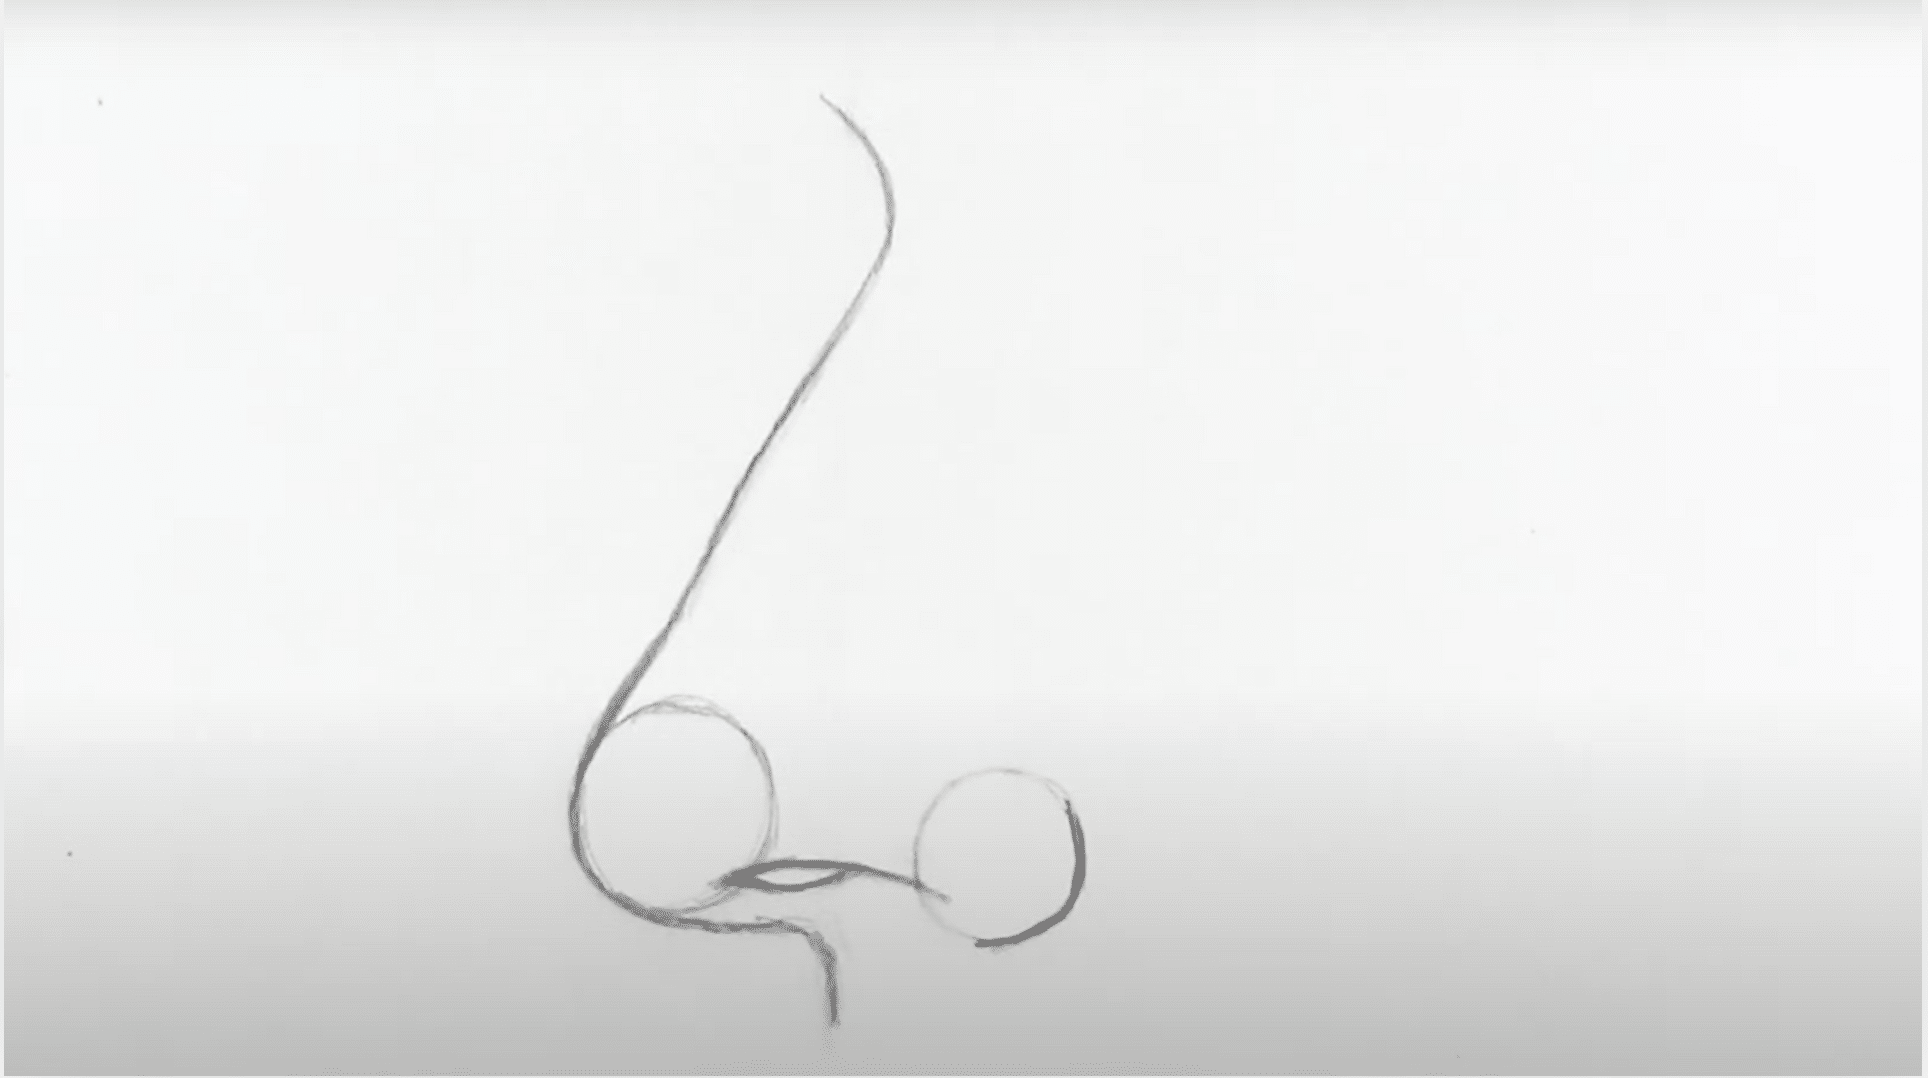
With the structure in place, the artist begins adding detail to the nostril and outer edge of the nose. This step creates dimension and anchors the nose firmly on the face.
To do this:
- Draw a curved line between the two circles that resembles the number six, forming the base of the nostril.
- Add a bracket-shaped curve hugging the bottom right of the second circle to represent the nose wing.
- Lightly refine these lines, keeping them clean yet natural.
Step 5: Shade and Refine the Form
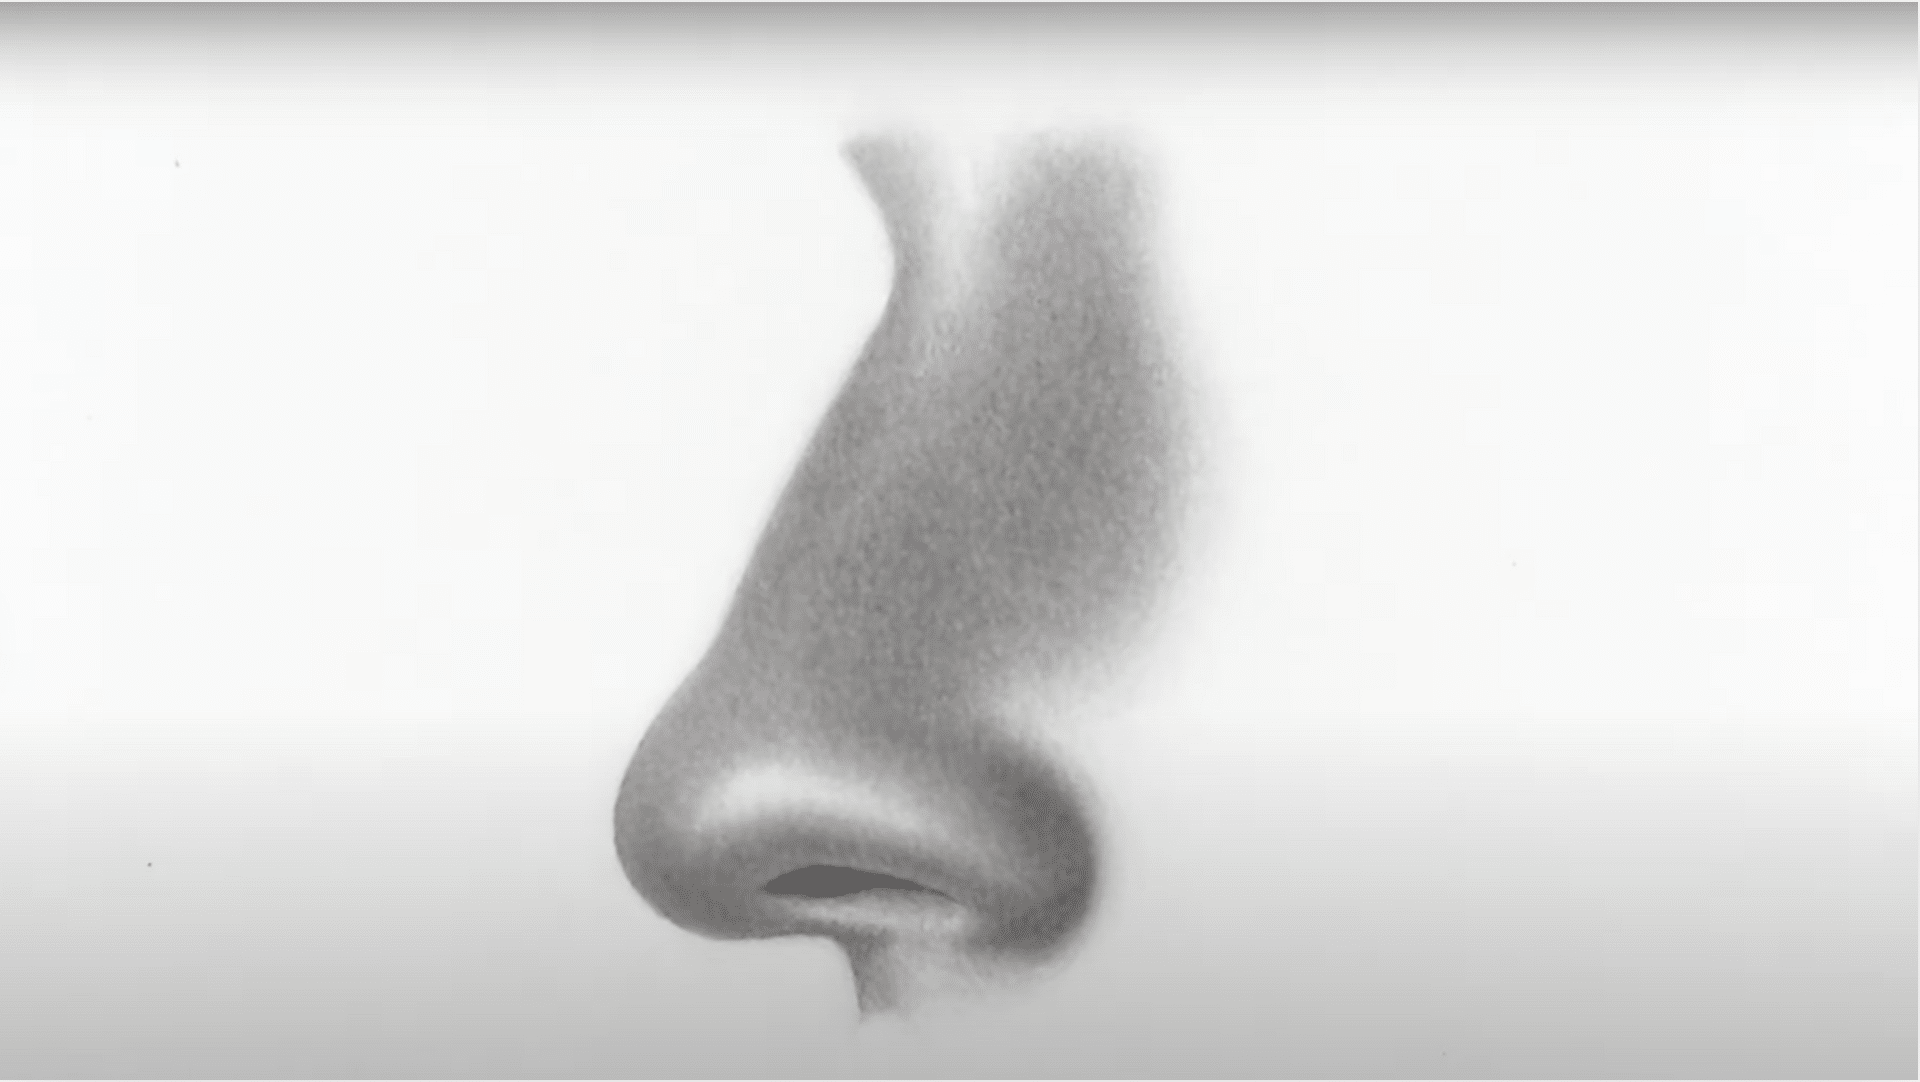
Shading begins with gentle circular strokes, a technique called circlism. By layering circles, the artist creates smooth skin textures. Shadows are built up gradually, darkening where the nose curves away from the light.
Blending is done using a tissue or stump, while highlights are enhanced by lifting graphite with an eraser. The artist continues adjusting light and dark areas until the nose looks soft and lifelike.
Creative Lifelike Nose Drawings
Artists often experiment with various styles when creating nose drawings. Each style brings a unique feel to portraits. Here are some creative approaches to nose drawings.
Profile Noses
Three-Quarter View
Normal Front-View Nose
Shadowed Noses
Line Art Noses
Cross-Hatched Noses
Nose with Face Detailing
Conclusion
Learning how to draw a nose requires patience and practice. This guide has provided artists with essential techniques for creating lifelike nose drawings that add character to their portraits.
By following these steps, artists can capture the subtle curves, shadows, and highlights that make noses appear three-dimensional on paper.
Why does this matter? A well-drawn nose can transform an entire face, drawing from amateur to professional. It serves as a central feature that anchors other facial elements.
Artists should remember that every nose is unique. The techniques shared here offer a foundation, but observing real people and photographs remains crucial for capturing diversity in nose drawings.
With regular practice and attention to detail, anyone can master how to draw a nose with confidence and skill.