Do you look at artists’ work and wonder how they make those lines come alive? Many people think drawing well takes special gifts from birth. Not true! Learning
What if you could learn methods that make your progress faster? Good news – there are tested ways to build your skills that work for beginners and experienced artists alike.
You’ll find real satisfaction as your drawings improve and others notice your progress too. The steps in this guide will help you move forward right away.
Ready to make your drawings better? Let’s start with these simple ways you can use today.
Why Is Practicing Drawing Important for Skill Improvement?

Regular practice is the foundation of getting better at drawing. Here’s why it matters so much:
- Builds muscle memory: Your hand learns to move with more control and precision when you practice often, making your lines smoother and more confident.
- Trains your eyes: Daily practice helps you notice shapes, shadows, and proportions that you might miss otherwise, improving how you see the world around you.
- Creates good habits: Setting aside time to draw regularly helps form a routine that makes improvement steady and long-lasting.
- Provides visible progress: Looking back at your older drawings shows you how far you’ve come, which boosts your motivation to keep going.
- Reduces fear: The more you practice, the less scary blank pages become, helping you overcome the worry about making mistakes.
Consistent practice turns drawing from a challenge into a natural part of your day.
How to Improve Your Drawing Skills: Essential Tools, Techniques, and Exercises
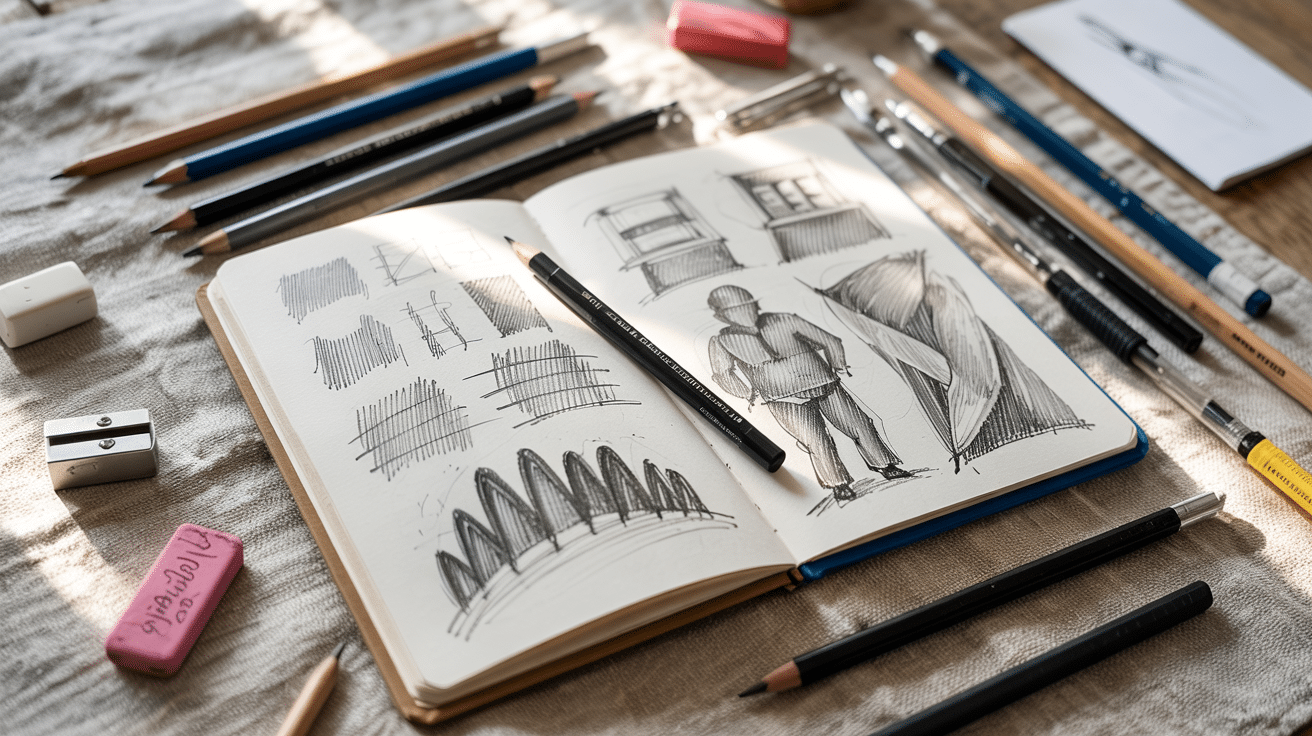
The right tools, proven techniques, and regular exercises form the three pillars of drawing improvement. When you combine these elements in your practice, you’ll see your skills grow more quickly than with random practice alone.
Must-Have Drawing Tools
1. Graphite Pencils
These come in various hardness levels from 9H (hard) to 9B (soft) for different line weights and shading effects.
- Intended Use: Creating outlines, sketching, shading, and adding details to drawings.
- Learning Curve: Low – Even beginners can start making marks right away, but mastering pressure control takes practice.
Top Recommendation: Goldfaber Graphite Pencils
2. Sketch Paper
A smooth, white surface that works well with most drawing tools and erases cleanly.
- Intended Use: Daily practice, quick studies, and planning more complex artwork.
- Learning Curve: Very low – just start drawing, though learning how different papers affect your marks comes with time.
Buy it here: Necessities Sketching Pad by Artist’s Loft
3. Kneaded Eraser
A soft, moldable eraser that lifts graphite without damaging paper.
- Intended Use: Lightening areas, creating highlights, and fixing small mistakes.
- Learning Curve: Medium – takes practice to shape it for precise erasing and lifting techniques.
Top Recommendation: Faber-Castell Erasers – Drawing Art kneaded Erasers
4. Blending Stumps
Tightly rolled paper tools with pointed tips for smoothing and blending.
- Intended Use: Softening lines, creating smooth transitions in shading, and adding texture.
- Learning Curve: Medium – requires practice to achieve subtle blending without smudging too much.
Top Recommendation: N NOROCME 12 PCS Blending Stumps
5. Fine Liner Pens
Permanent ink pens in various tip sizes for clean, defined lines.
- Intended Use: Outlining, adding final details, and creating bold line art.
- Learning Curve: Medium – requires steady hand and confidence since marks are permanent.
Top Recommendation: Fine Liner Pen Set
6. Light Box
A flat, illuminated surface that allows you to see through paper for tracing and transferring.
- Intended Use: Transferring sketches to final paper, practicing shapes, and refining work.
- Learning Curve: Easy to use once you understand proper paper thickness limitations.
Buy it here: ArtSkills Ultra Thin Light Pad
7. Color Pencils
Wax or oil-based colored pencils that layer and blend for rich color effects.
- Intended Use: Adding color to sketches, creating fully colored artwork.
- Learning Curve: Medium, as color mixing and layering techniques take time to master.
Buy it here: Crayola Kids Pre-Sharpened Colored Pencils
Disclaimer: The products mentioned above are based solely on personal experience and are not sponsored or affiliated with any brands.
Best Techniques to Improve Your Drawing Skills
8. Hatching and Cross-Hatching
A method of creating tone and texture using parallel lines and crossed lines to build up shadows.
- What you need: Fine-tip pens or sharp pencils, smooth paper, and a steady hand.
- Learning Curve: Medium – it takes practice to maintain even spacing and pressure.
- How to execute: Draw parallel lines in one direction for hatching. For cross-hatching, add another layer of lines at an angle to the first set. Vary the spacing between lines to create lighter or darker areas.
9. Blind Contour Drawing
Drawing without looking at your paper, keeping your eyes fixed on the subject the whole time.
- What you need: Paper, any drawing tool, and an interesting subject with clear outlines.
- Learning Curve: Easy to start but challenging to master.
- How to execute: Fix your eyes on your subject and don’t look down at your paper. Start at one point and slowly trace the contours of your subject with your pen, moving it at the same speed as your eyes.
10. Value Studies
Creating small, quick sketches focusing only on light and dark areas, not details.
- What you need: Charcoal or soft pencils, a small sketchbook, and various reference images.
- Learning Curve: Medium – requires learning to see and simplify complex subjects.
- How to execute: Choose a reference with clear light contrast. Divide your page into small boxes. In each box, draw the same subject using only 3-5 values (shades), focusing on the light pattern, not the details.
11. Gesture Drawing
Quick sketches (30 seconds to 2 minutes) that capture the movement and energy of a subject.
- What you need: Large paper, soft pencil or charcoal, and moving subjects or pose references.
- Learning Curve: Medium – teaches you to capture essence without details.
- How to execute: Set a timer. Use loose, flowing lines to capture the main action line and basic forms. Focus on the pose’s energy and weight distribution rather than accurate details.
12. Negative Space Drawing
Drawing the spaces around and between objects rather than the objects themselves.
- What you need: A viewfinder (paper with a square cut out), pencil, and paper.
- Learning Curve: Medium-high – requires a mental shift in how you see subjects.
- How to execute: Look through your viewfinder at your subject. Instead of drawing the subject, draw only the shapes of the empty spaces between and around parts of your subject.
13. Thumbnail Sketching
Very small, quick sketches are used to plan compositions and test ideas before starting a larger work.
- What you need: Small sketchbook and a pencil.
- Learning Curve: Low – simple to do but valuable for developing composition skills.
- How to execute: Draw multiple small boxes on your page. In each box, quickly sketch different possible layouts for your final drawing, focusing on the major shapes and value patterns.
14. Grid Method
A technique for accurately transferring and scaling images using a grid system.
- What you need: Ruler, pencil, eraser, reference image, and drawing paper.
- Learning Curve: Low – straightforward but requires patience.
- How to execute: Draw a grid of equal squares on your reference and a proportional grid on your paper. Copy the contents of each square from the reference to the corresponding square on your paper.
Must-Do Exercises to Get Better at Drawing
15. Upside-Down Drawing
Drawing a reference image that has been turned upside-down to train your brain to see shapes rather than objects.
- What you need: Reference image, paper, pencil, and a way to hold or display the reference upside-down.
- Instructions: Turn a reference image upside-down. Draw exactly what you see without trying to “correct” or identify the objects. Focus only on copying the lines and shapes as they appear.
16. Continuous Line Portraits
Creating a portrait without lifting your pencil from the paper to improve hand control and observation.
- What you need: Portrait reference, paper, and a pen or pencil.
- Instructions: Start at one point of the face. Draw the entire portrait without lifting your tool from the paper. Move slowly, focusing on the connections between features.
17. Timed Sketch Challenge
Drawing the same subject multiple times with decreasing time limits to learn efficiency.
- What you need: Timer, sketchbook, pencil, and a subject to draw.
- Instructions: Draw your subject in 5 minutes. Then, draw it again in 2 minutes, then 1 minute, and finally 30 seconds. Compare the results to see what details you prioritized.
18. Daily Object Studies
Drawing common household objects to practice seeing and capturing form and texture.
- What you need: Small sketchbook, pencil, and various household objects.
- Instructions: Choose one object each day. Study it from different angles. Draw it three times: once as a quick sketch, once focusing on its form, and once focusing on its texture and details.
19. Texture Sampler
Creating a collection of different texture techniques on a single page for reference.
- What you need: Drawing paper, various drawing tools (pencils, pens, markers).
- Instructions: Divide your paper into small squares. In each square, draw a different texture (wood, metal, fabric, stone, etc.) using different techniques. Label each for future reference.
Common Mistakes to Avoid to Improve Your Drawing Skills
Even the most basic drawing skills can grow faster when you sidestep these common pitfalls that slow down many new artists.
1. Rushing through the basics and trying to create complex artwork too soon can lead to frustration and poor foundation skills.
2. Comparing your work to artists with years of practice instead of focusing on your own progress daily.
3. Using low-quality materials makes techniques harder to execute, especially when learning new skills that require the right tools.
4. Avoiding subjects that seem too hard limits your growth and prevents you from finding weak spots to work on.
5. Drawing what you think you see rather than what’s actually there, which happens when your brain tries to shortcut the observation process.
Being patient with your progress and working through these common issues will help you build solid skills that last.
Wrapping It Up
Learning
So what does this mean for someone wanting to draw better? These methods work for anyone willing to put in the time. The combination of proper tools, proven techniques, and regular practice creates real progress that friends and family will notice.
What’s next? Pick one exercise from this guide and try it today. Set aside just 15 minutes to practice. Then come back tomorrow and do it again.
Share your progress in the comments below, or join an art community to connect with other growing artists.
Your drawing expedition is just beginning!