
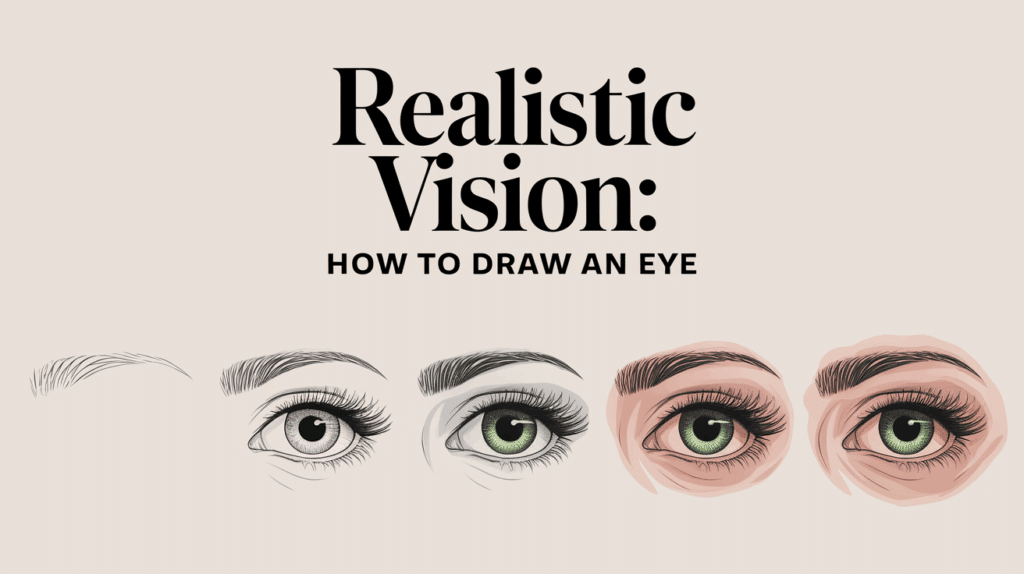
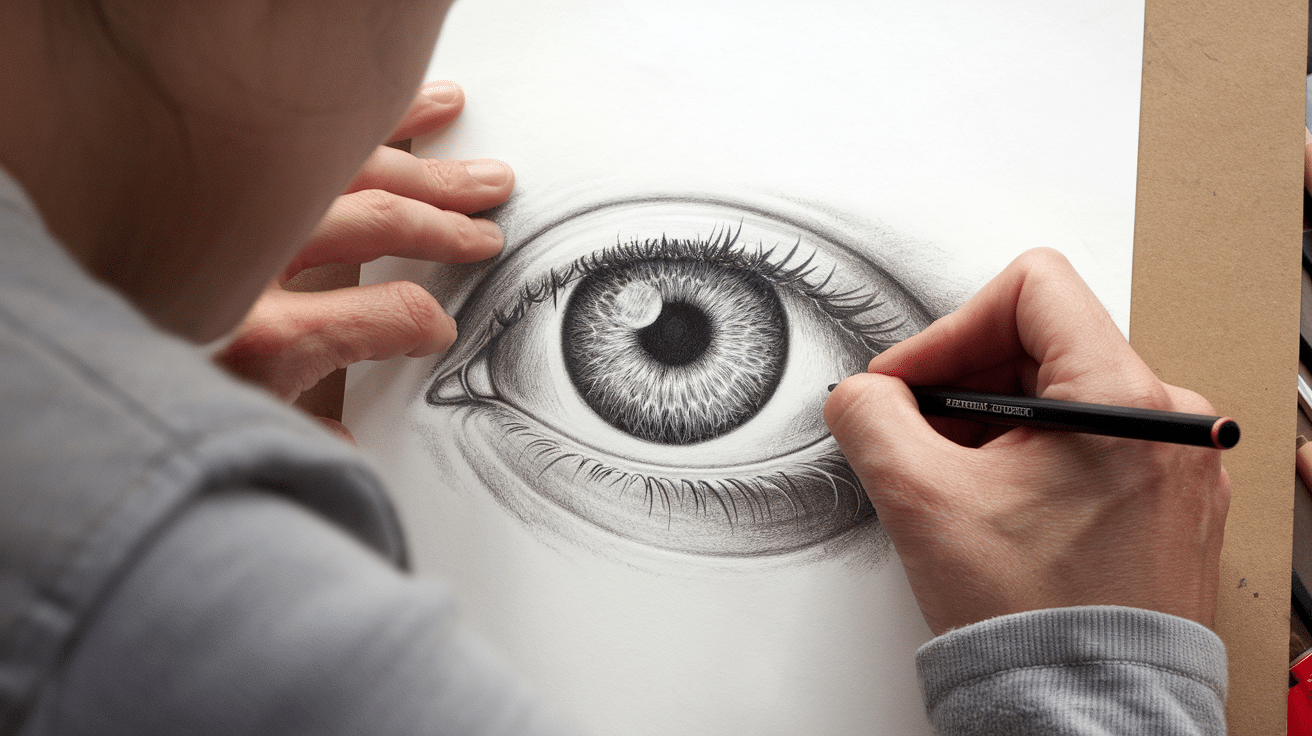
Ever looked at a drawing of an eye that seemed so real you could almost see it blink? Many artists find eyes hard to draw. They struggle with getting the shine right or making the lashes look natural.
Want to know what separates beginner art from professional work? It’s all in the eyes. The good news is that anyone can learn to draw lifelike eyes with the right steps.
This blog will show you how to draw an eye that looks real. From basic shapes to tiny details that make all the difference.
You’ll learn about proportions, shading techniques, and how to add that special sparkle that brings your drawing to life.
By the end of this post, you’ll have the skills to create eye drawings that truly connect with viewers.
Essential Tips for Drawing Eyes as a Beginner
Drawing eyes may seem like a tough task for someone just starting out. Many beginners feel stuck when trying to capture the details that make eyes look real.
The good news is that with some basic tips and tricks, anyone can improve their eye drawing skills quickly. Let’s look at some key tips that help beginners create more realistic eyes in their artwork.
1. Start with basic shapes: Begin with simple circles and ovals to form the outline of the eye. This creates a good base that helps get the right size and placement before adding any details.
2. Pay attention to proportions: Make sure the eye size fits well with the rest of the face. In most cases, eyes are placed about one eye-width apart from each other on the face.
3. Study real eyes: Look at photos or real people to notice how light hits the eye. This helps understand where to place highlights and shadows for a more natural look.
4. Practice the iris detail: Work on the colored part of the eye by drawing light lines moving outward from the pupil. This small detail can make the eye look much more lifelike.
5. Don’t forget the eyelids: Draw the curves of both upper and lower eyelids carefully. The top lid usually casts a small shadow on the eye that adds depth to your drawing.
6. Add subtle shadows: Place soft shadows under the top eyelid and around the eye socket. This gives your drawing more dimension and makes the eye look less flat.
7. Focus on the light spot: Add a small white dot or two in the iris to show light reflection. This tiny detail brings the eye to life and creates that sparkly effect.
Perfect Steps on How to Draw an Eye
Drawing a realistic eye is a gentle balance of observation, patience, and layering. For anyone picking up a pencil to bring life to a blank page, the eye is a captivating subject that speaks volumes with subtle shading and detail.
These steps simplify the process into seven digestible steps that gradually build form and depth. Whether someone is just beginning or refining their sketching skills, following these thoughtful instructions will encourage confidence in every stroke.
Step 1: Lightly Sketch the Basic Eye Shape
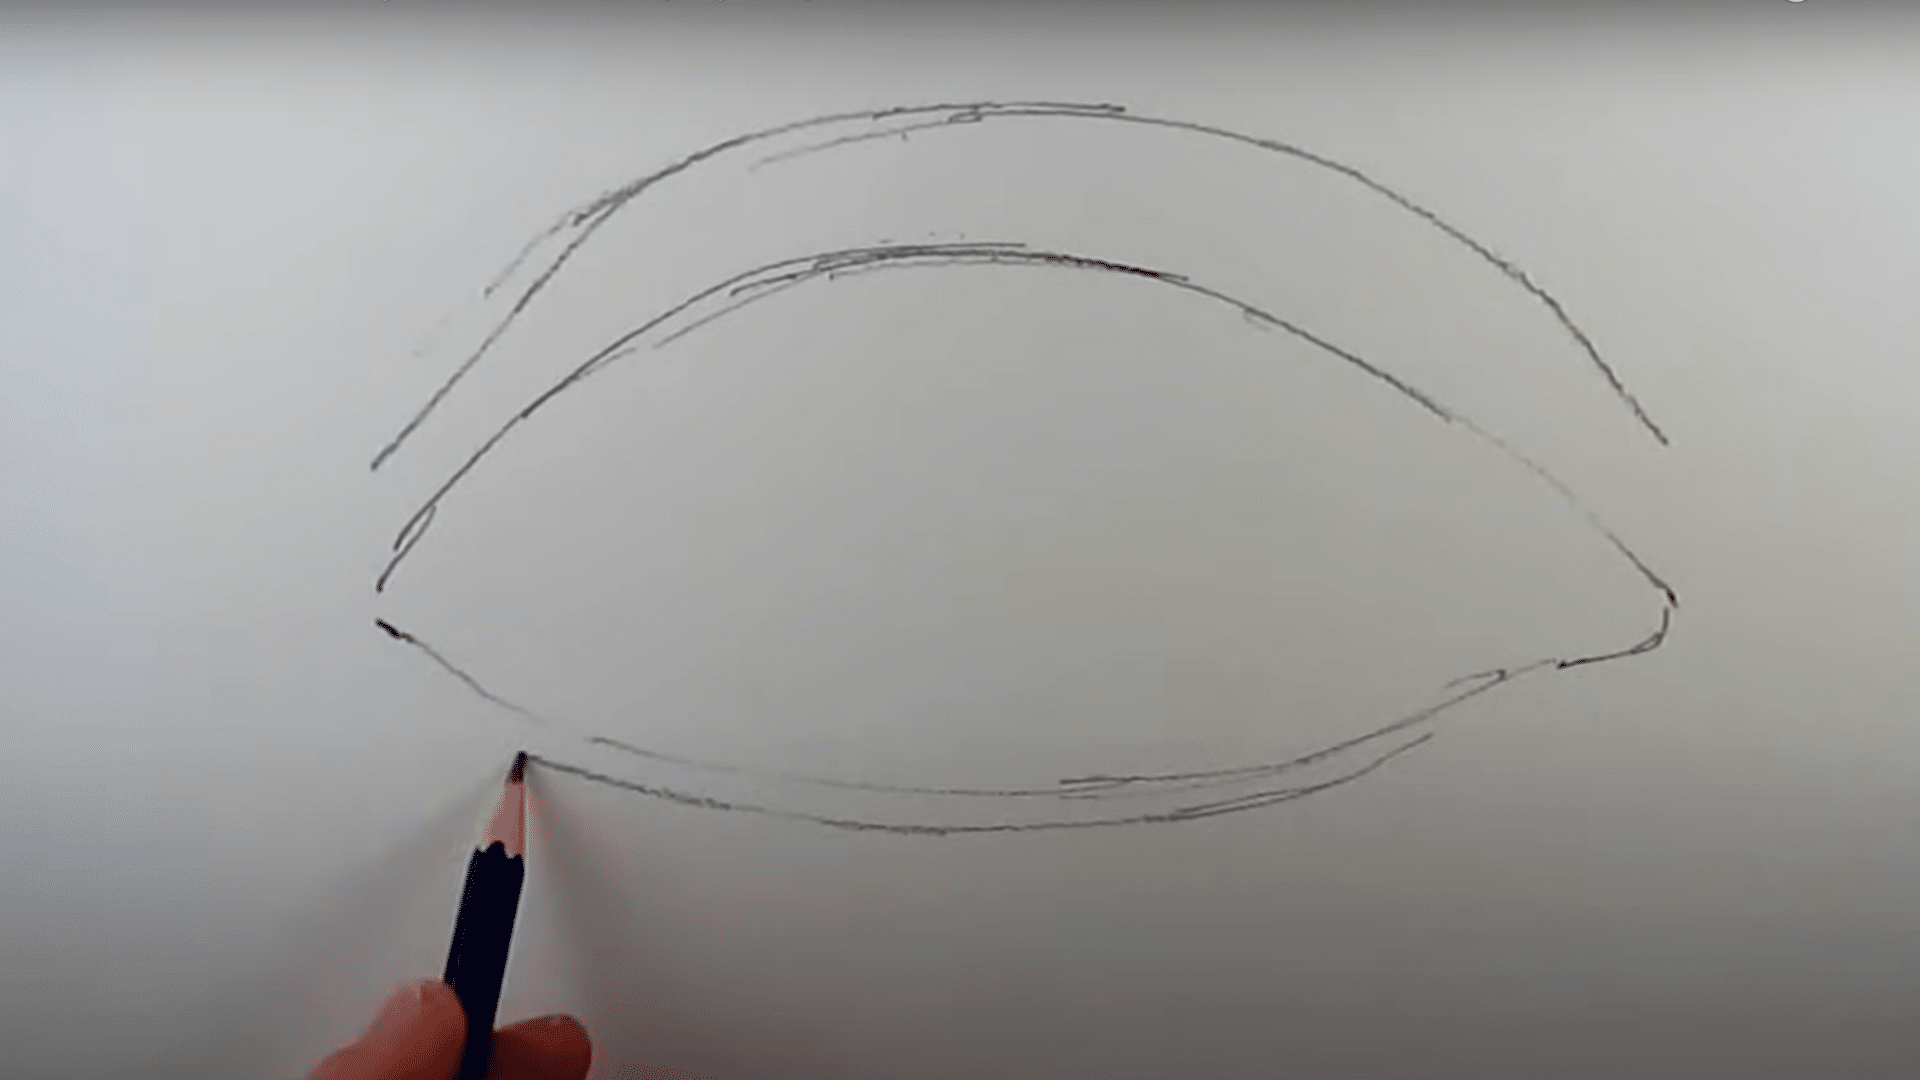
Begin by imagining the placement of the eye on your page. Once confident, gently sketch a horizontal oval to form the eyeball.
Add a curved upper eyelid line that overlaps the top of the oval slightly, and a lower lid line that gently rests under the oval, suggesting its volume and depth.
Step 2: Draw the Iris and Pupil
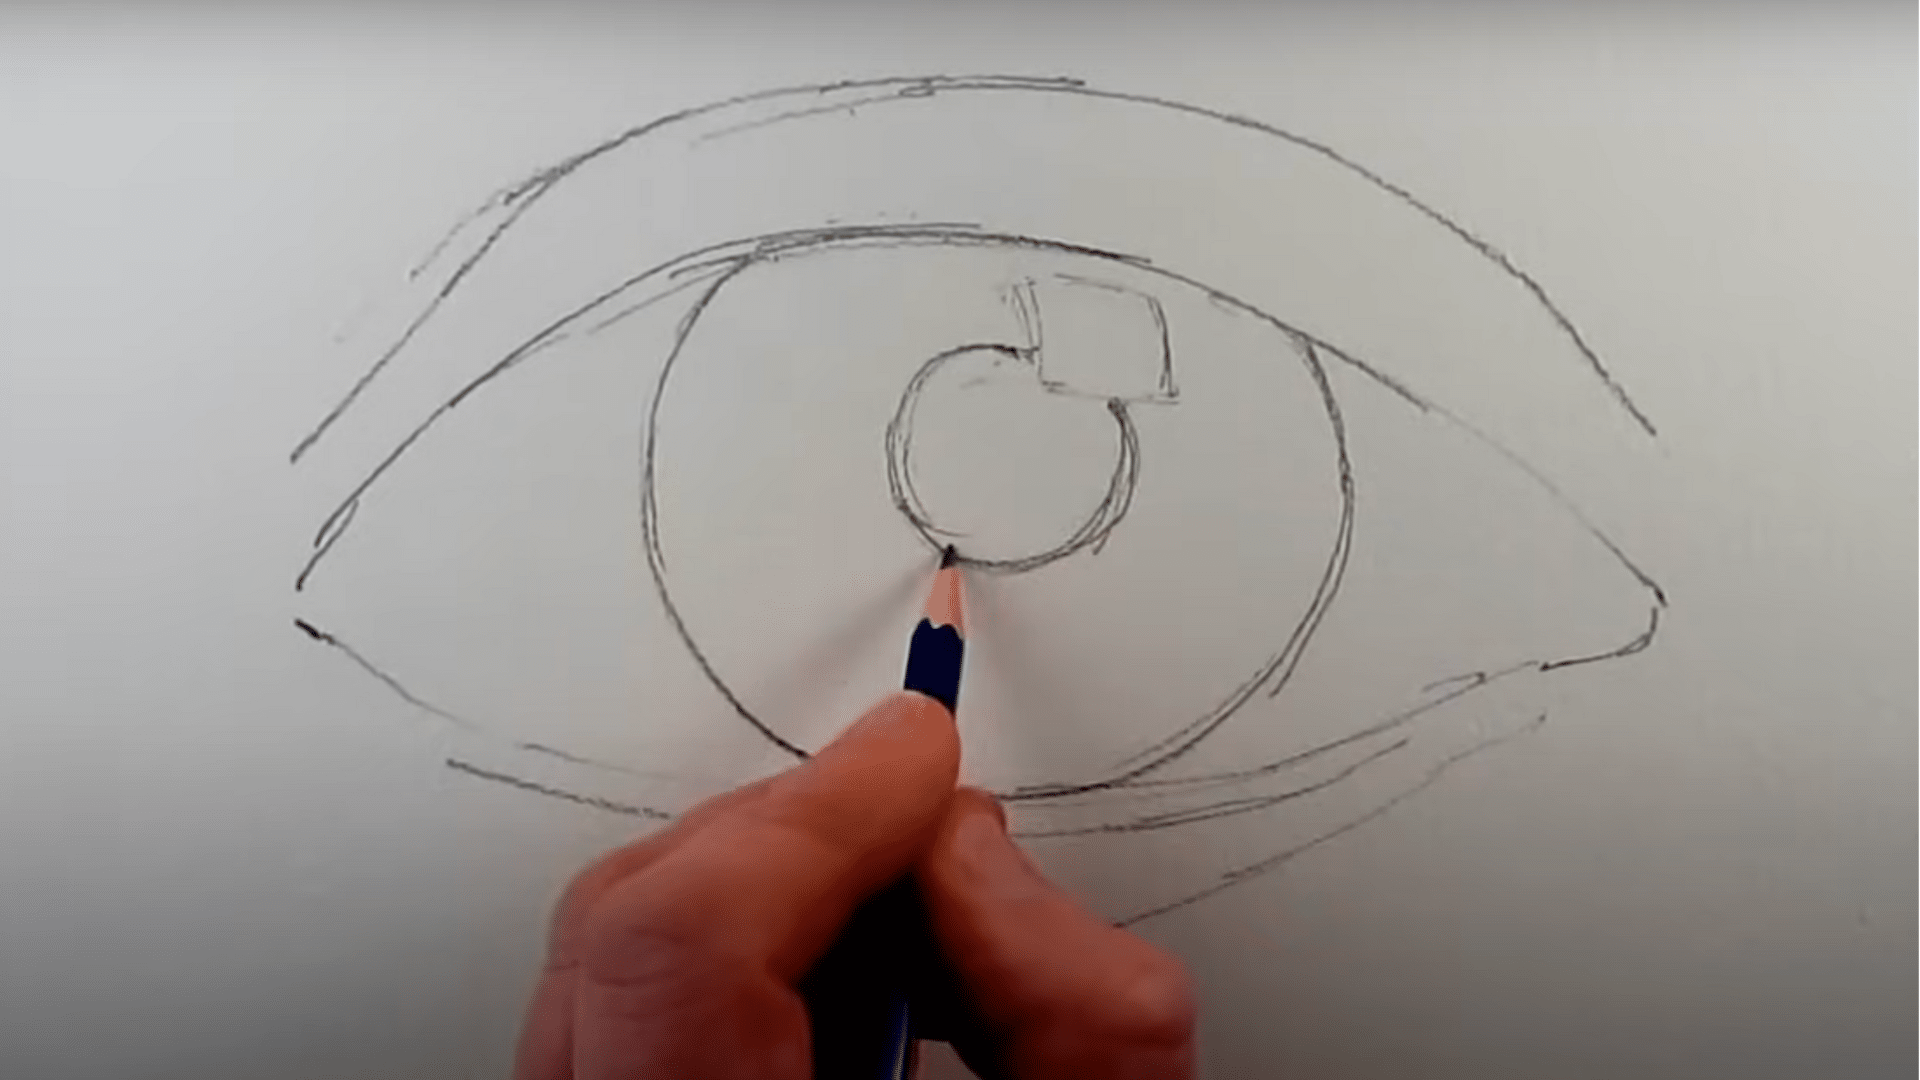
With the eye shape lightly sketched, the next step is placing the iris and pupil accurately to bring focus and realism.
- Draw a circular iris so that the top part slightly disappears beneath the upper eyelid
- Let the bottom of the iris touch or gently dip below the lower lid
- Inside the iris, leave a clean area for a highlight, which will add life to the eye
- Sketch the pupil at the center of the iris and allow the highlight to overlap part of it for visual contrast
This careful positioning sets the foundation for depth and expression.
Step 3: Add Tear Duct and Eyelid Thickness

On the inner corner of the eye, sketch the tear duct, typically closer to the nose. Then add a short curved line above the upper lid to represent its thickness.
Step back briefly to view the eye’s overall shape and make subtle adjustments if needed to improve symmetry and flow.
Step 4: Carefully Place Eyelashes
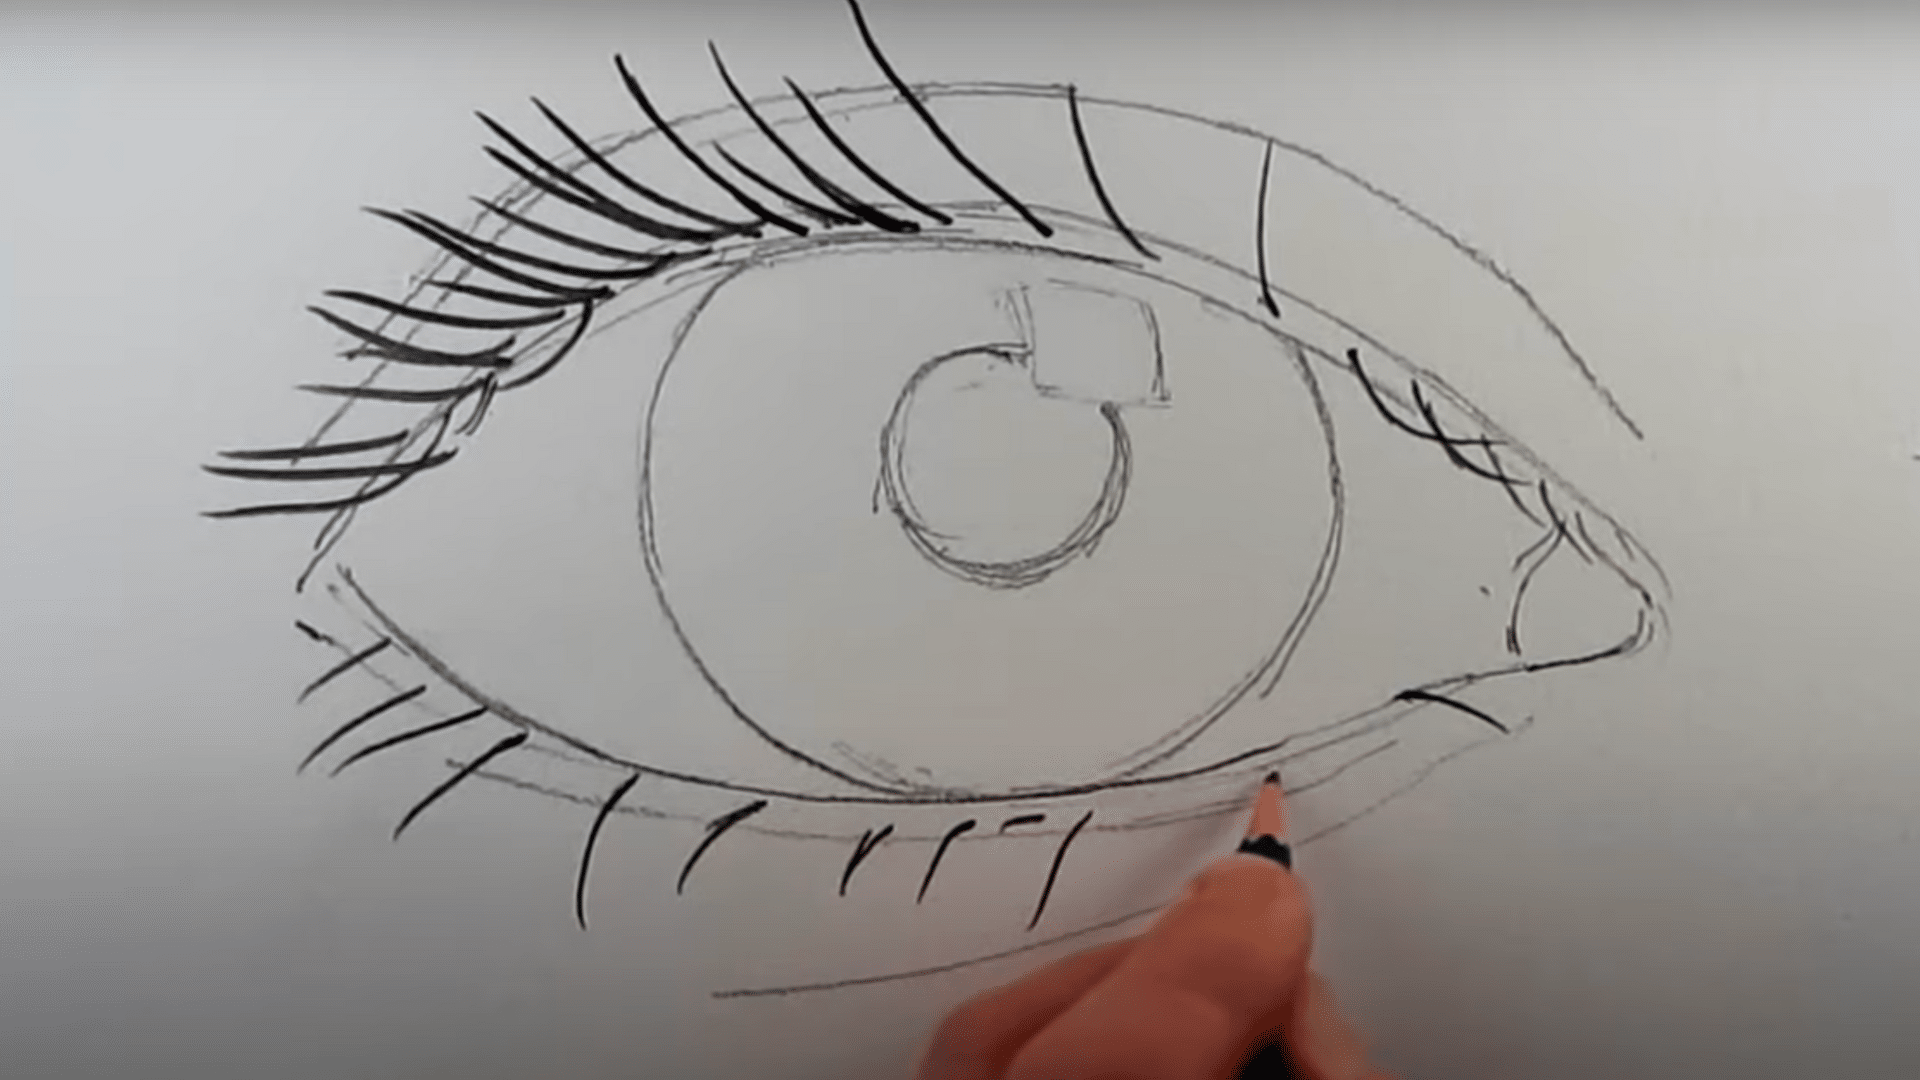
Begin adding individual eyelashes along the upper lid, applying firm yet deliberate pencil strokes. Each lash should vary slightly in direction and length for a natural effect.
Use pressure variation to create bold or delicate lines. Don’t hesitate to erase and correct lashes that feel out of place.
Step 5: Define the Iris Texture
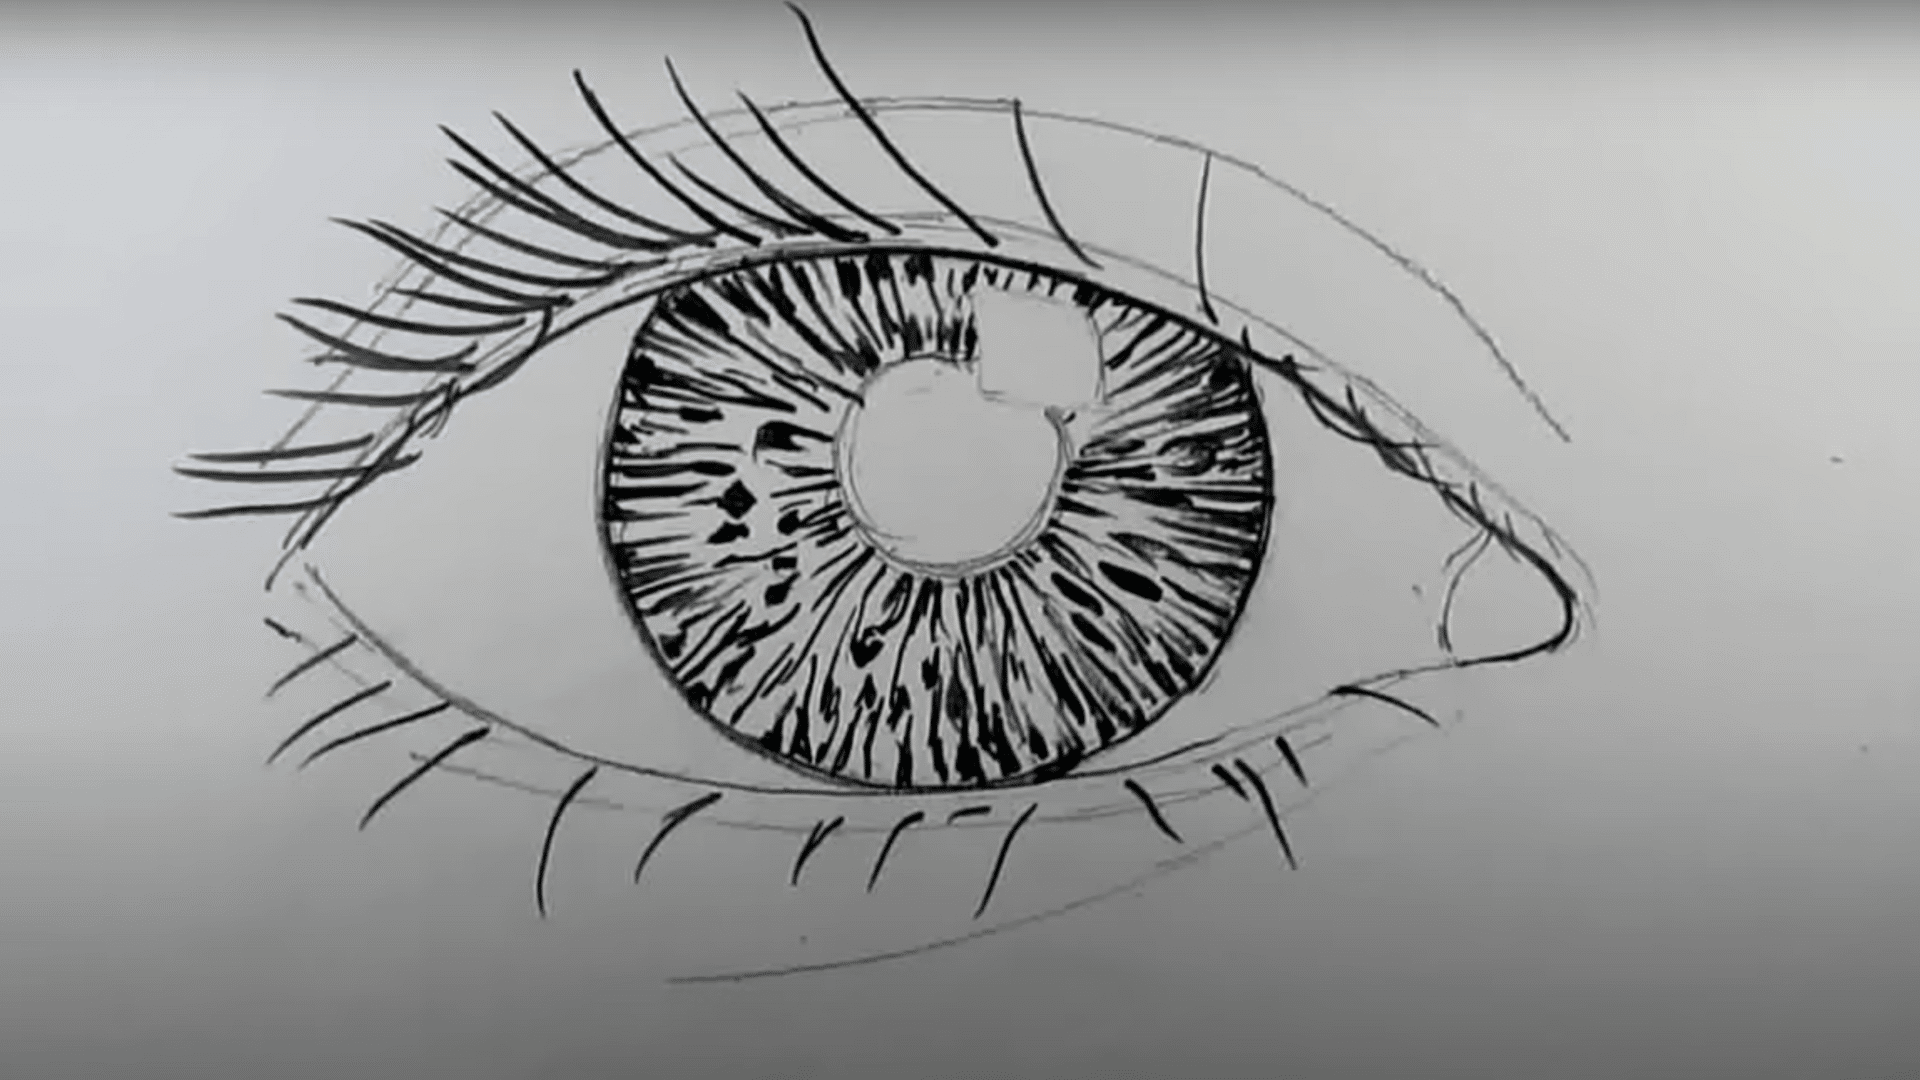
Once the pupil is shaded evenly, begin working outward from its center.
- Use short, broken strokes that radiate in various directions
- Vary the lengths, thicknesses, and gaps between lines
- Focus on adding texture without overcrowding the space
These irregular patterns mimic the complexity of a real iris and enhance its natural beauty
Step 6: Shade Mid-Tones and Shadows
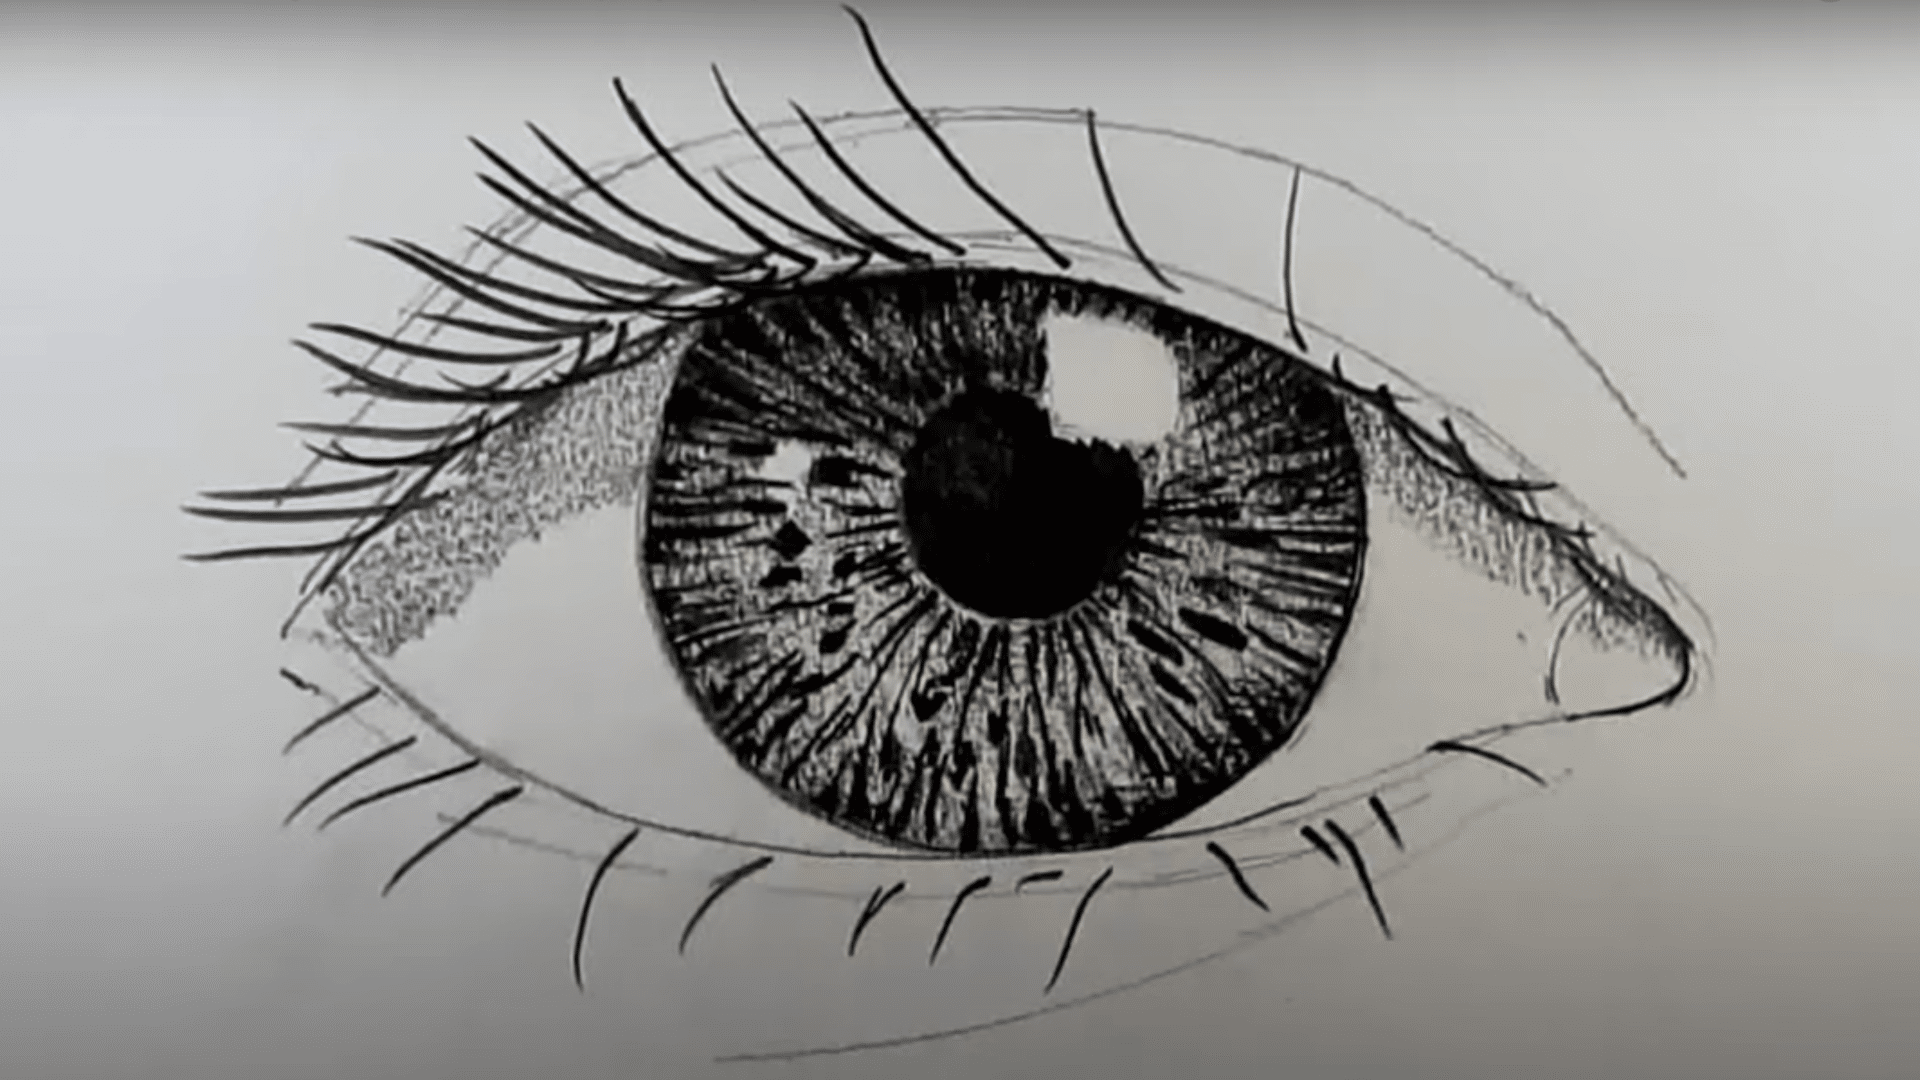
Using the side of the pencil, gently shade a soft mid-tone layer across the iris without covering the highlight.
Then, darken the upper part of the eyeball slightly to reflect the shadow cast by the eyelid. Gradually build this contrast to let the highlight shine through naturally.
Step 7: Add Form to the Surrounding Area
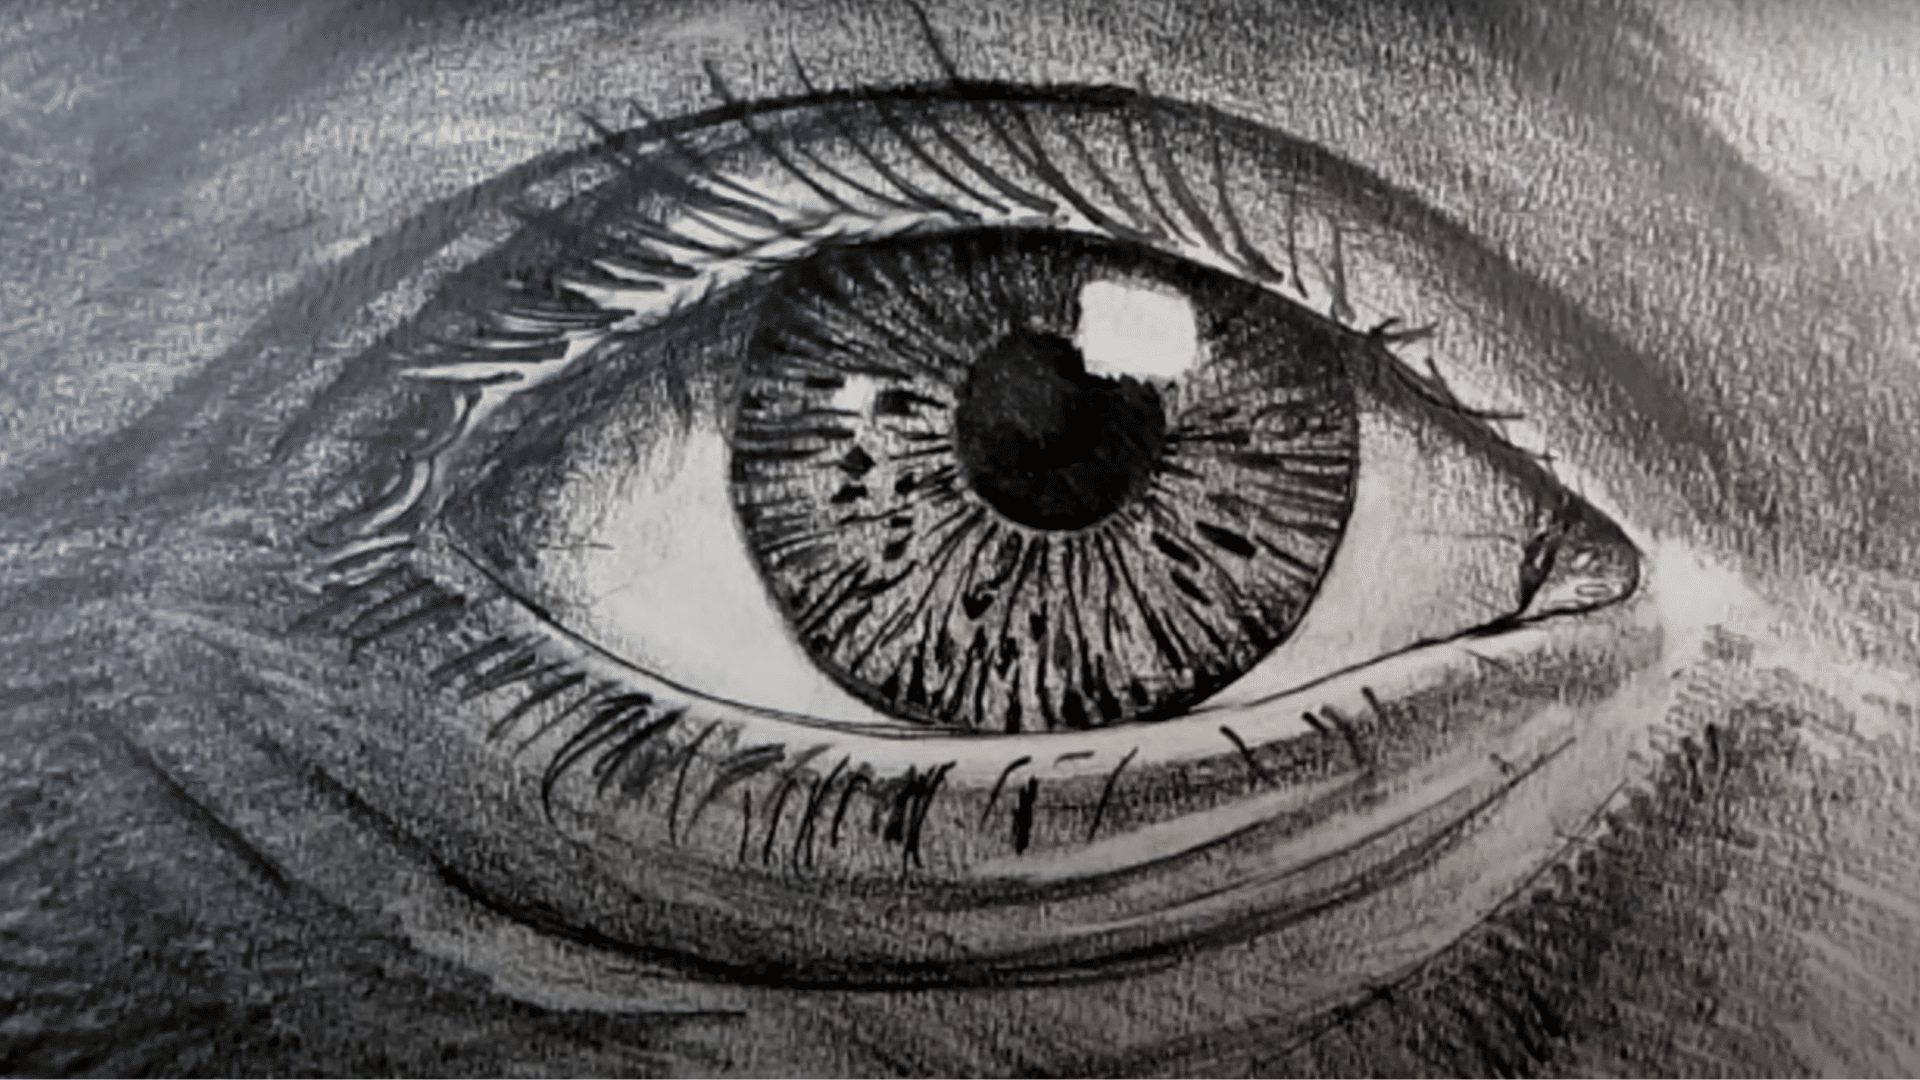
To make the eye feel part of a living face, give attention to the surrounding features. Begin shading the eyelid and skin nearby, using soft layers to suggest volume and structure.
- Add darker shading above the eye to indicate the fold of the upper lid
- Lightly shade below the eye to hint at the lower socket
- Blend edges softly so that the eye integrates smoothly into the face
This framing effect brings the drawing to life and balances the overall composition
How to Make Eye Drawings Look More Realistic
Taking eye drawings from basic to realistic requires attention to details that many artists overlook. Most people rush through the process and miss the small elements that bring an eye to life.
With a few key techniques, anyone can add realism to their eye drawings that will impress viewers. These tips focus on the fine points that make the difference between a flat drawing and one that seems to look back at you.
- Focus on light and shadow: Notice how light creates highlights on different parts of the eye. Add darker shading beneath the upper lid and lighter areas where light hits the eyeball for added depth.
- Include moisture effects: Eyes have a wet, glossy quality. Add small reflections and tiny highlights along the waterline and tear ducts to show this moisture.
- Draw realistic lashes: Eyelashes don’t stick out straight or have the same length. Make them curve naturally, with varied thickness and spacing between each lash.
- Show the whites accurately: The white part of the eye isn’t pure white. Add very subtle shading with light blues or pinks to make it look more natural and less like plain paper.
- Capture blood vessels: Include faint, thin red lines in the whites of the eyes. These should be barely visible but add a touch of realism that viewers notice.
- Draw the iris texture: The colored part has lines that radiate from the pupil. Add these fine lines with varying pressure to create texture within the iris.
- Get pupil size right: Pupils change size based on light. In bright settings, they appear smaller, while in low light, they grow larger. Match the pupil size to your scene’s lighting.
- Show skin texture around the eye: Don’t forget the tiny wrinkles, pores, and skin texture that surrounds the eye. These details add context and make the eye part of a real face.
Conclusion
Drawing realistic eyes takes time and practice. As shown in this blog, the small details matter most when creating eyes that seem to have life in them.
The way light reflects, how lashes curve, and even the slight variations in color all work together to make an eye drawing stand out.
Anyone can learn how to draw an eye with enough patience and the right techniques. By starting with basic shapes and gradually adding the subtle effects of light, texture, and moisture, artists can create truly striking eye drawings.
Remember that real eyes have imperfections, too. Including these small flaws often makes artwork look more authentic.
With each practice session, the process gets easier and the results more impressive. Soon enough, those realistic eyes will become a signature strength in any artist’s work.