The gentle art of painting a
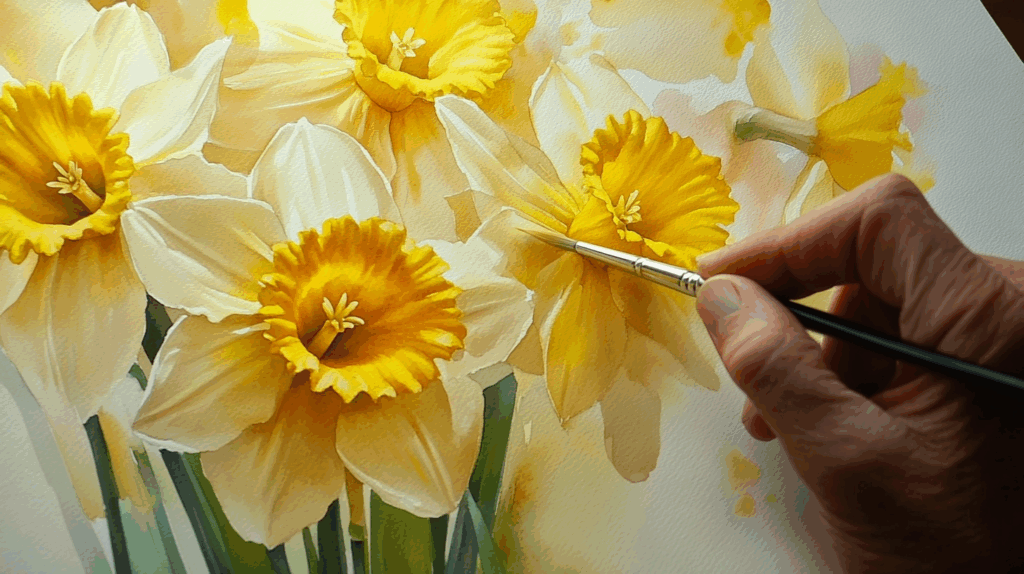
The soft edges and flowing colors of watercolor techniques match well with the daffodil’s natural grace.
Many painters find these flowers ideal for practicing basic techniques – from creating light washes for petals to adding small details that bring the flower to life.
The transparent quality of watercolor paint lets artists build layers that capture the daffodil’s subtle texture and sunny hue.
With just a few brushstrokes and some patience, anyone can create a gorgeous representation of these cheerful flowers. The following blog will show step-by-step methods to help readers create their watercolor masterpieces.
Mastering Watercolor Daffodil Painting for Beginners
Watercolor daffodils make perfect subjects for beginners who want to try their hand at painting. These bright spring flowers combine simple shapes with interesting details that help new painters learn basic techniques.
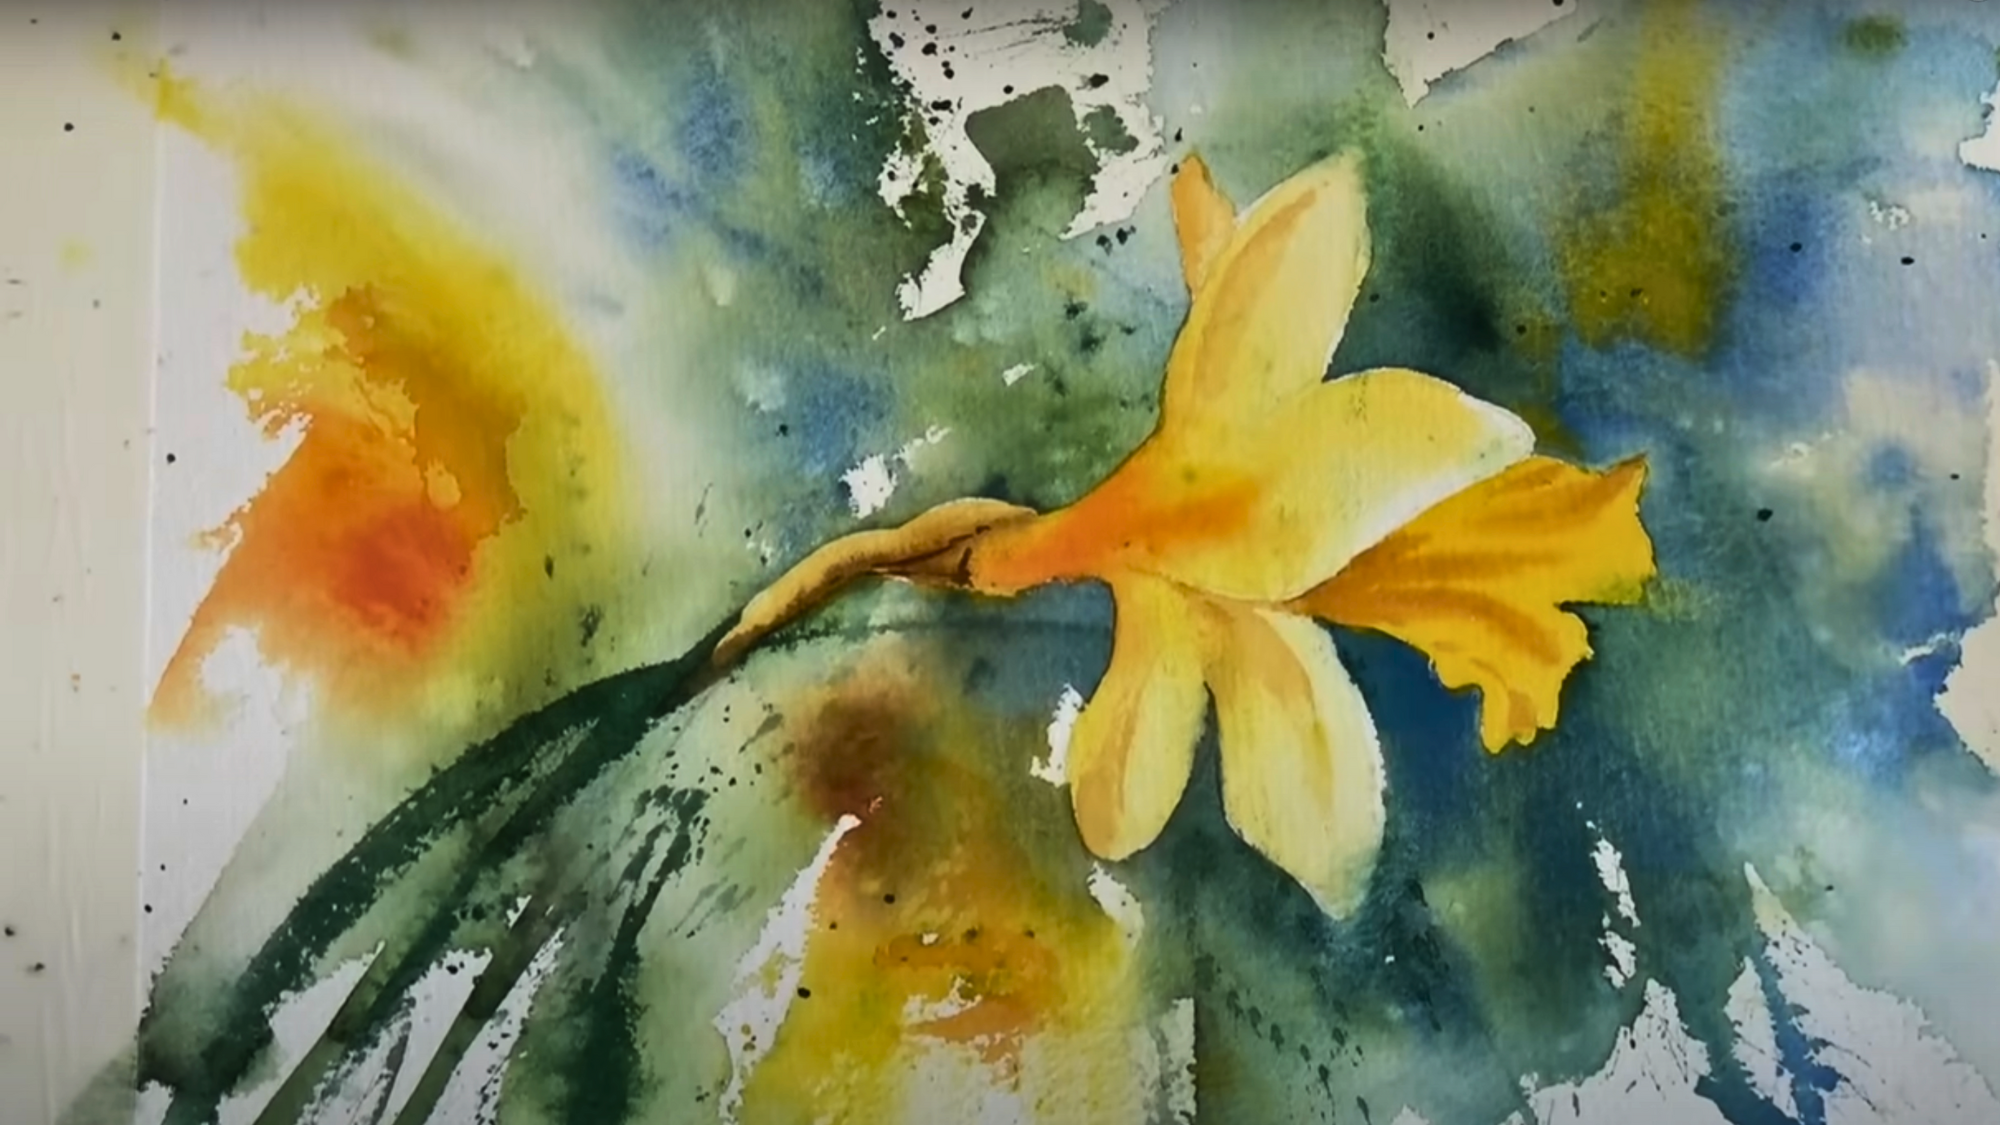
Begin with a soft pencil outline of your daffodil. Keep the lines light so they won’t show through the paint. The daffodil’s trumpet-shaped center and surrounding petals create a striking form that’s fun to capture.
When applying paint, work from light to dark. Start with a pale yellow wash for the petals, then add darker tones for shadows. The trumpet center usually needs a deeper orange-yellow shade to create depth.
Watercolor daffodils benefit from letting layers dry between applications. This patience allows colors to build without becoming muddy. Remember that white spaces in your painting are just as important as the colored areas; they create highlights that make your flowers look real.
Practice makes progress! Each
How to Draw a Lovely Watercolor Daffodil
Creating a gorgeous
1. Gather Your Materials and Prep Your Space

Before you get into painting your watercolour daffodil, make sure your setup is ready.
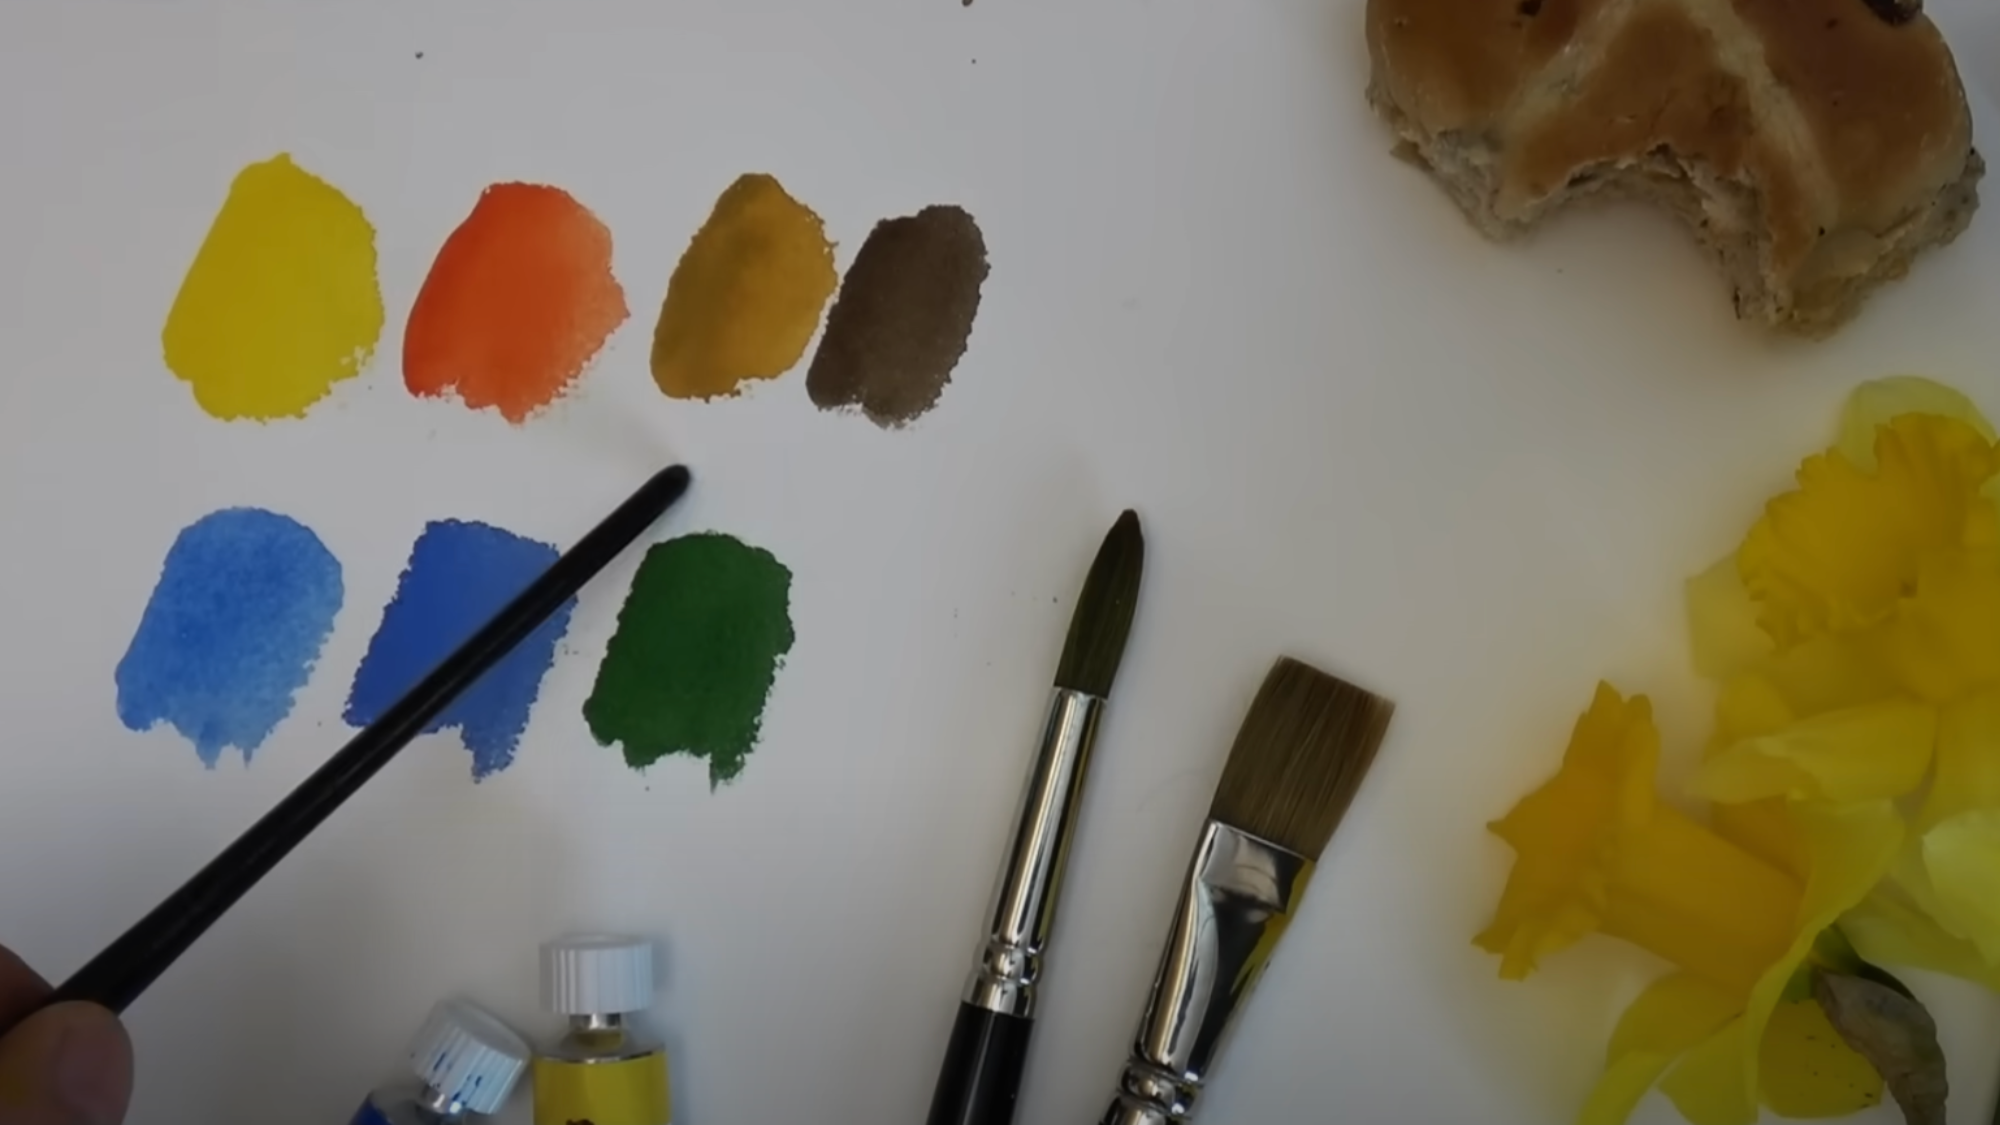
You’ll need 300 lb rough watercolor paper (like Saunders Waterford), masking fluid, a No. 12 round brush, a ¾ inch flat brush, and a simple daffodil sketch.
For colors, choose cadmium yellow, cadmium orange, yellow ochre, burnt umber, cerulean blue, cobalt blue, and sap green. Keep clean water, tissues, and a spray bottle nearby. A tidy, sunlit workspace makes all the difference.
2. Lay the Foundation with Wet-on-Wet Background
Begin by taking your ¾ inch flat brush and gently brushing clean water across selected areas of the paper. Don’t soak the entire surface; leave some parts dry to create natural texture and variation. The aim is to keep things fluid and loose.
- While the paper is still damp, load your brush with cadmium yellow and cadmium orange.
- Lightly dab and flick the colors into the wet sections.
- Let the pigments bleed and blend without overworking them.
This creates a dreamy, out-of-focus backdrop that frames your
3. Add Expressive Color and Contrast
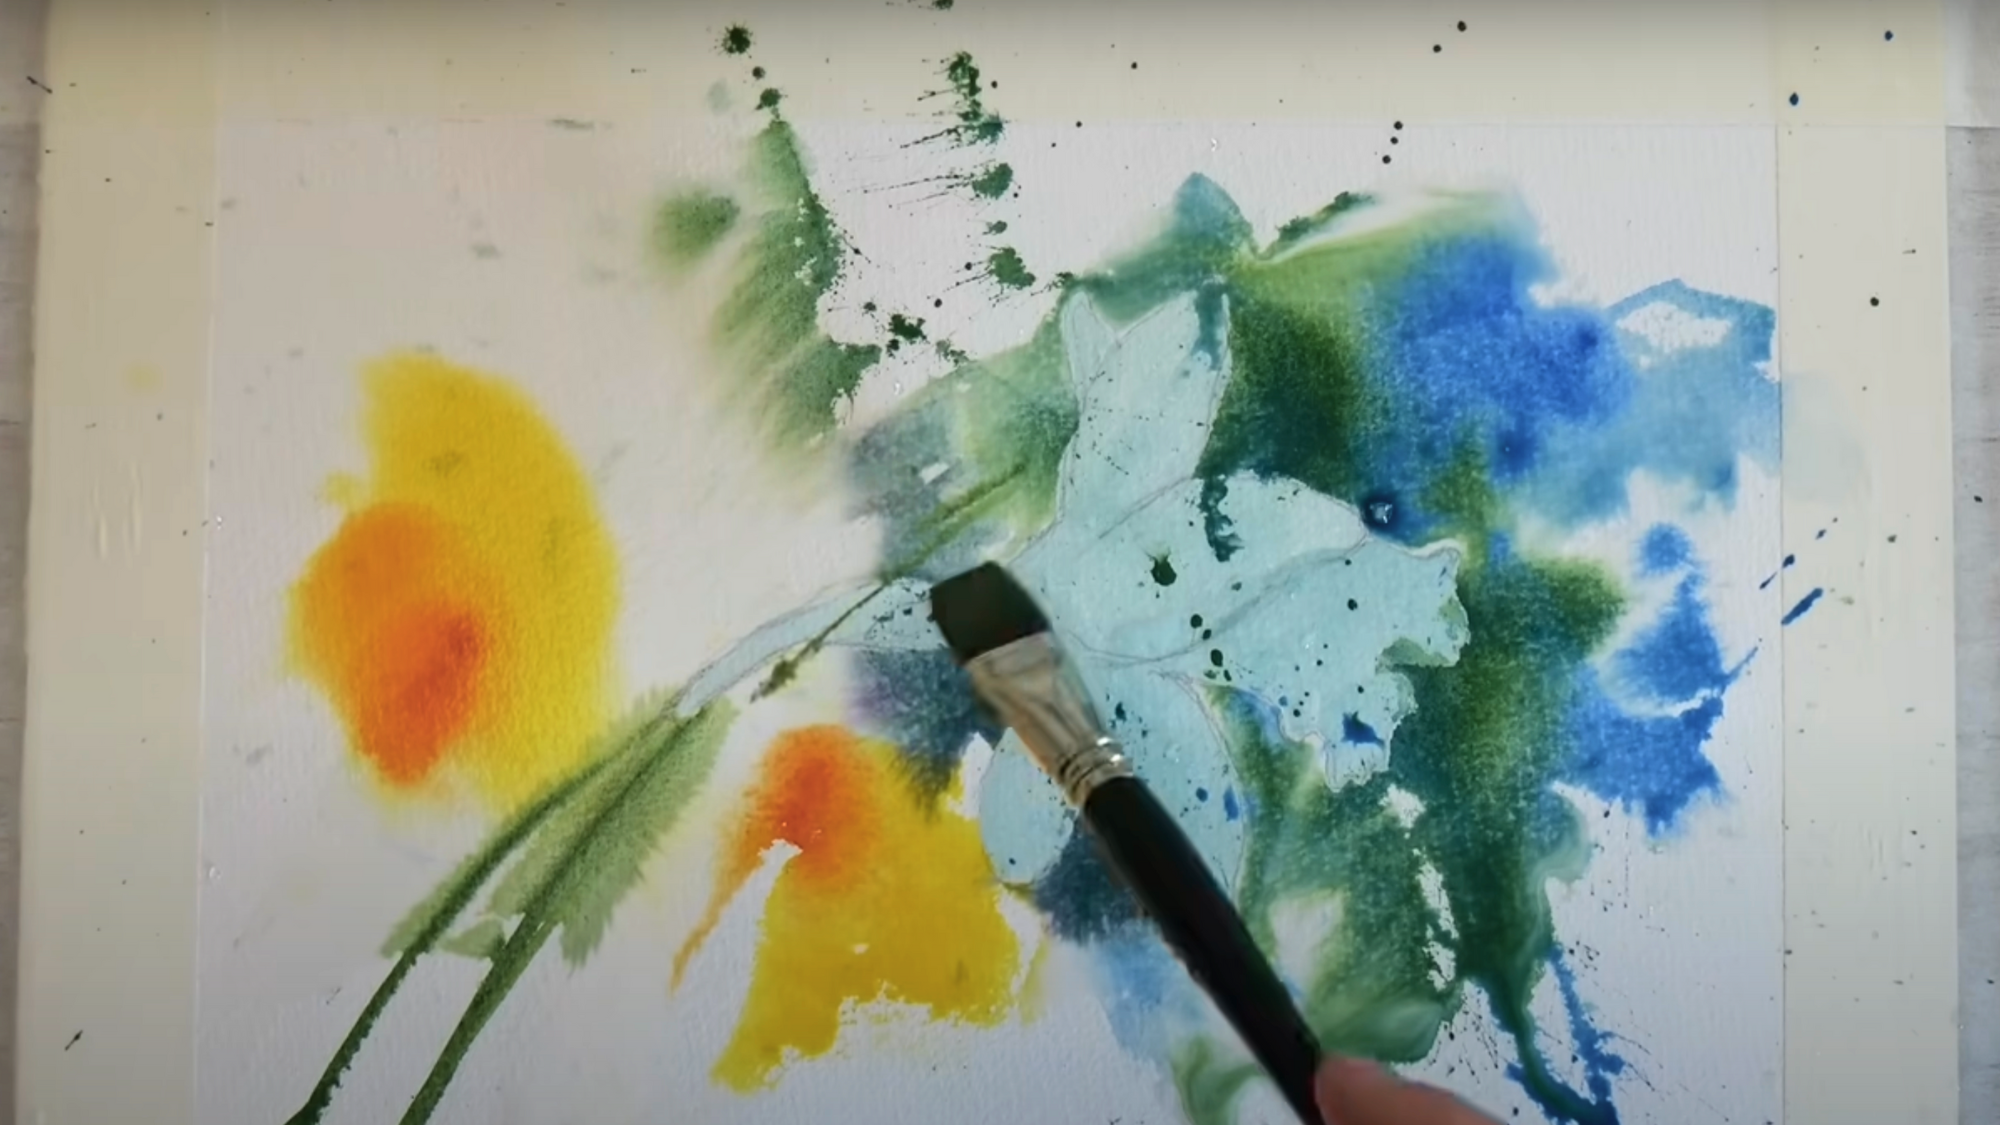
Now comes the exciting part: bringing energy and depth to your background. Begin by loading your brush with sap green, cobalt blue, and cerulean blue.
Dab and swirl these colors freely around the flower shape, focusing on creating a contrast that frames the bloom. Add touches of cadmium orange for warmth and interest.
Allow the pigments to mingle and flow naturally, encouraging soft transitions and accidental charmer. These lively marks will amplify the surrounding area and make your watercolour daffodil stand out with charm.
4. Let it Dry and Take a Breather
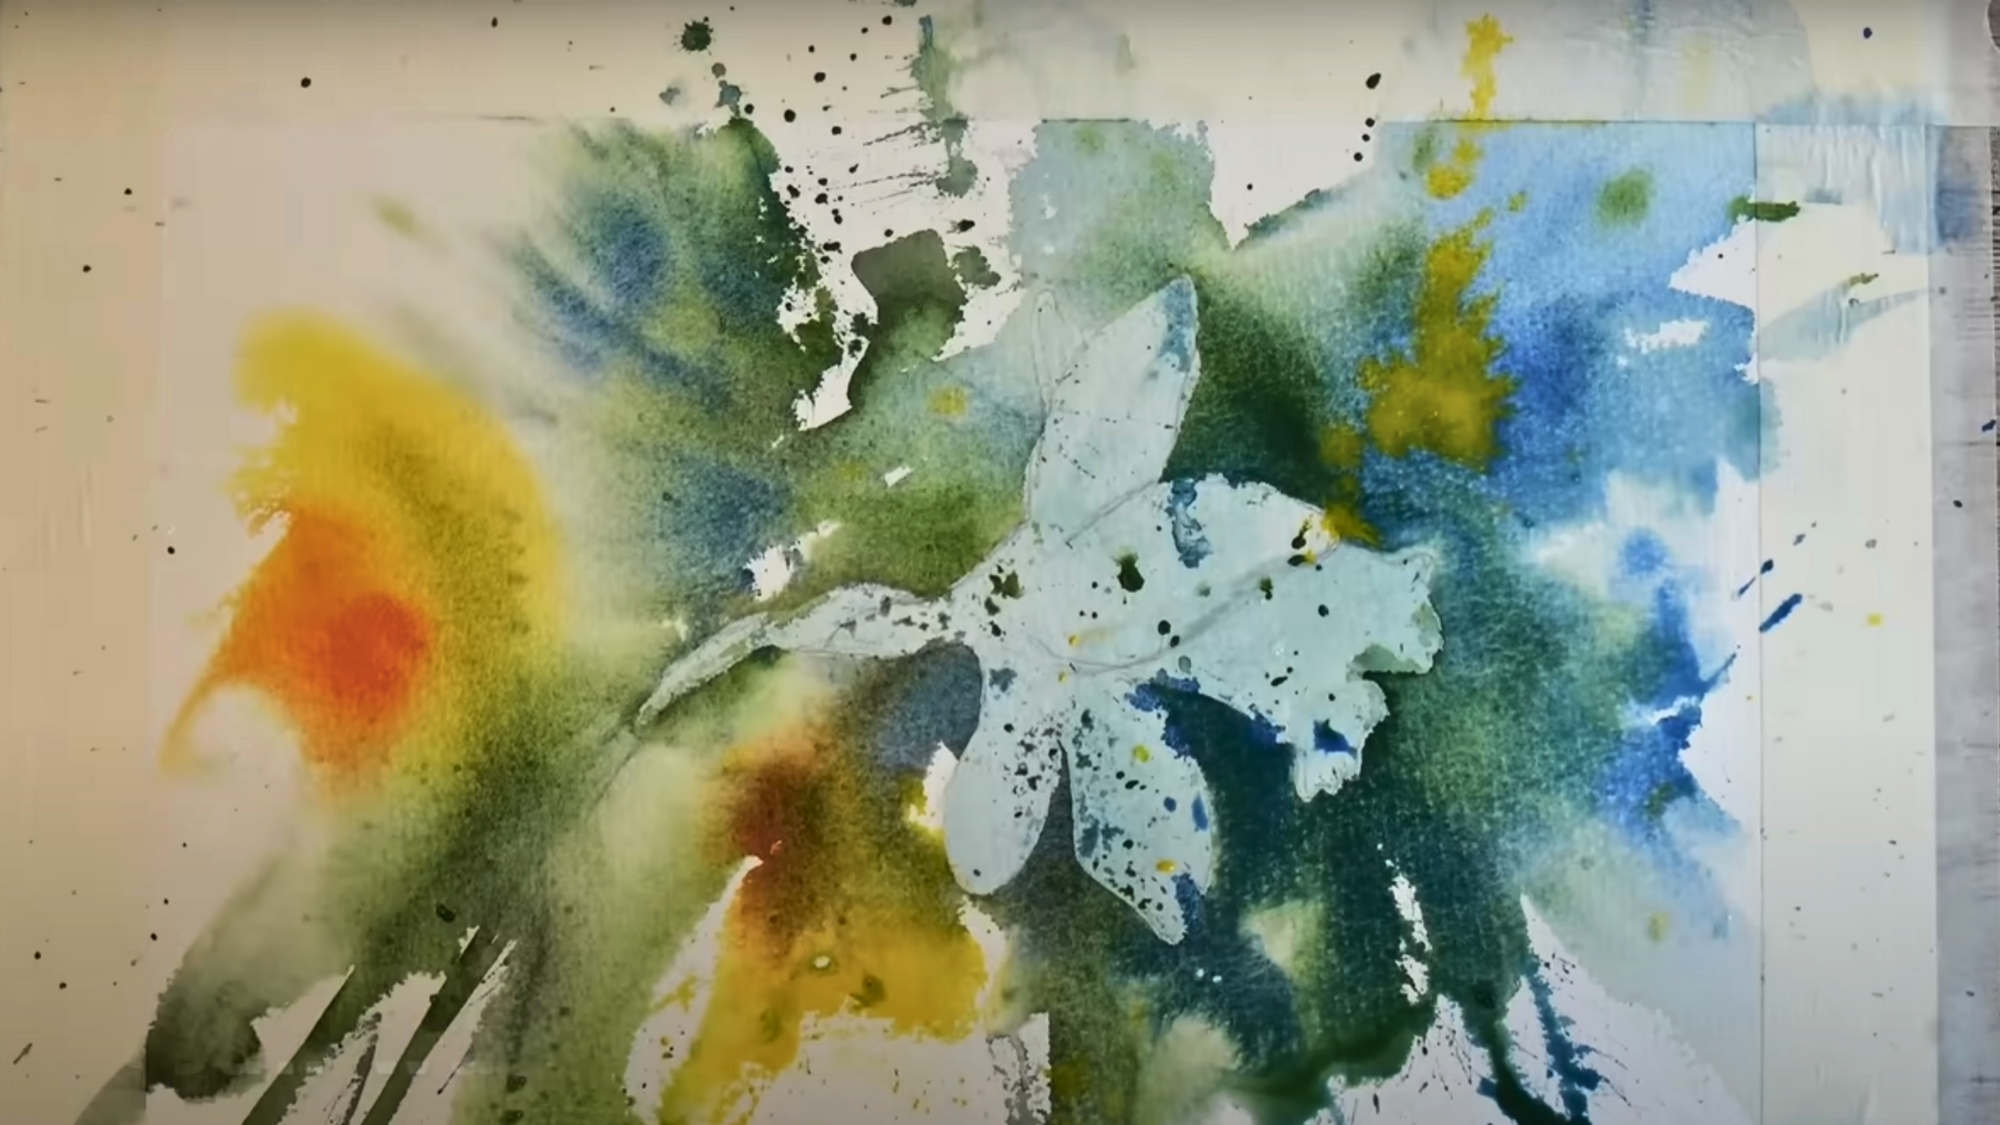
Once you’ve laid down the lively background, it’s essential to let your watercolour daffodil dry thoroughly. Rushing into the next step too soon can cause unwanted bleeding and dull the defined shapes you’re about to create.
- Allow the painting to air dry naturally with no heat tools, as they may warp the paper.
- While it dries, step away and relax. A cup of tea or a quiet pause outside can refresh your mind.
This short break not only gives you a moment of calm but also prepares your
5. Define the Foliage and Remove Masking Fluid
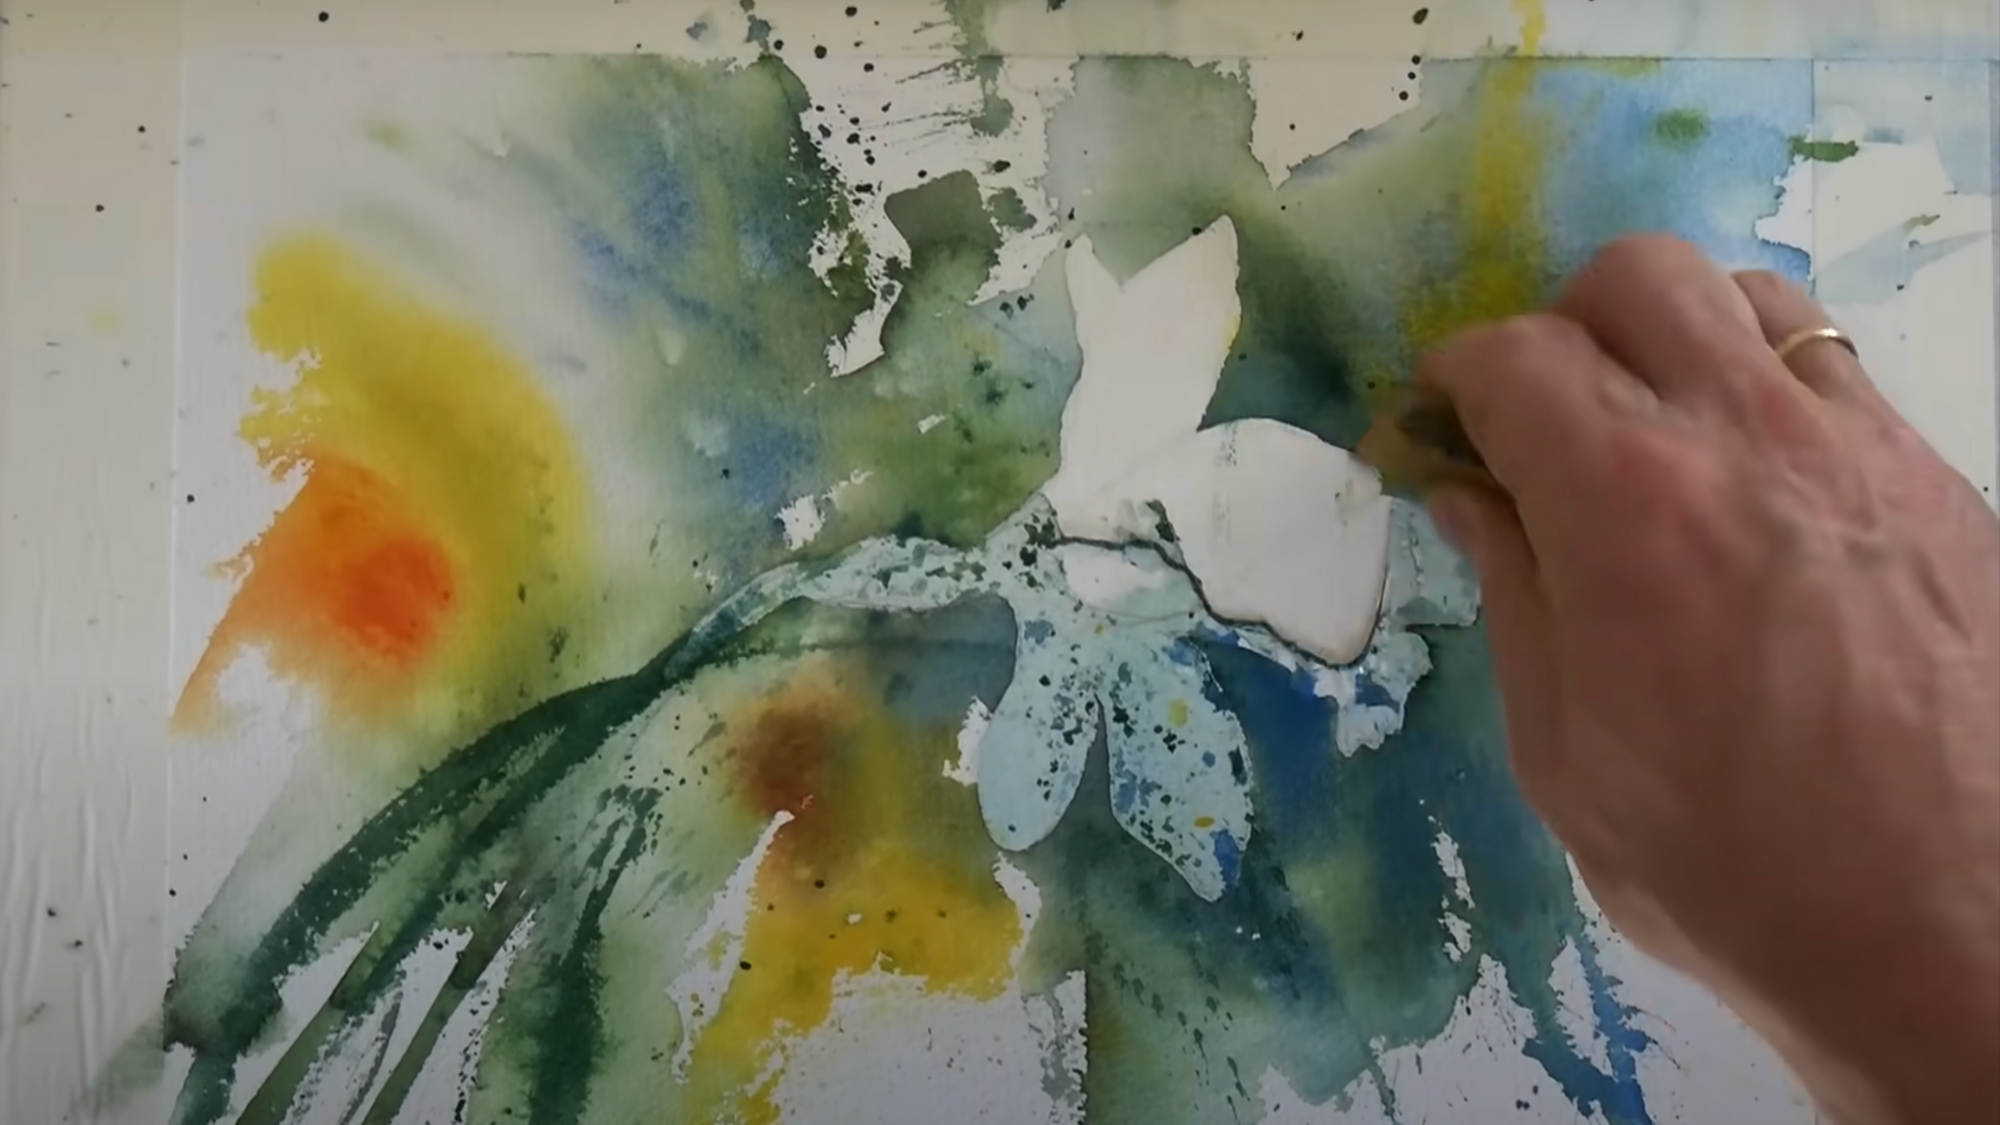
On the left side of your paper, lightly mist the surface with clean water, just enough to dampen it without soaking. This will help your paint glide smoothly.
Mix cobalt blue with sap green and use swift, confident strokes to suggest loose foliage, adding visual interest beside the flower.
Once this layer is completely dry, gently remove the masking fluid using a soft eraser. Work slowly and carefully preserving these bright highlights is essential for the fresh, luminous effect of your watercolour daffodil.
6. Paint the Flower with Layered Warmth
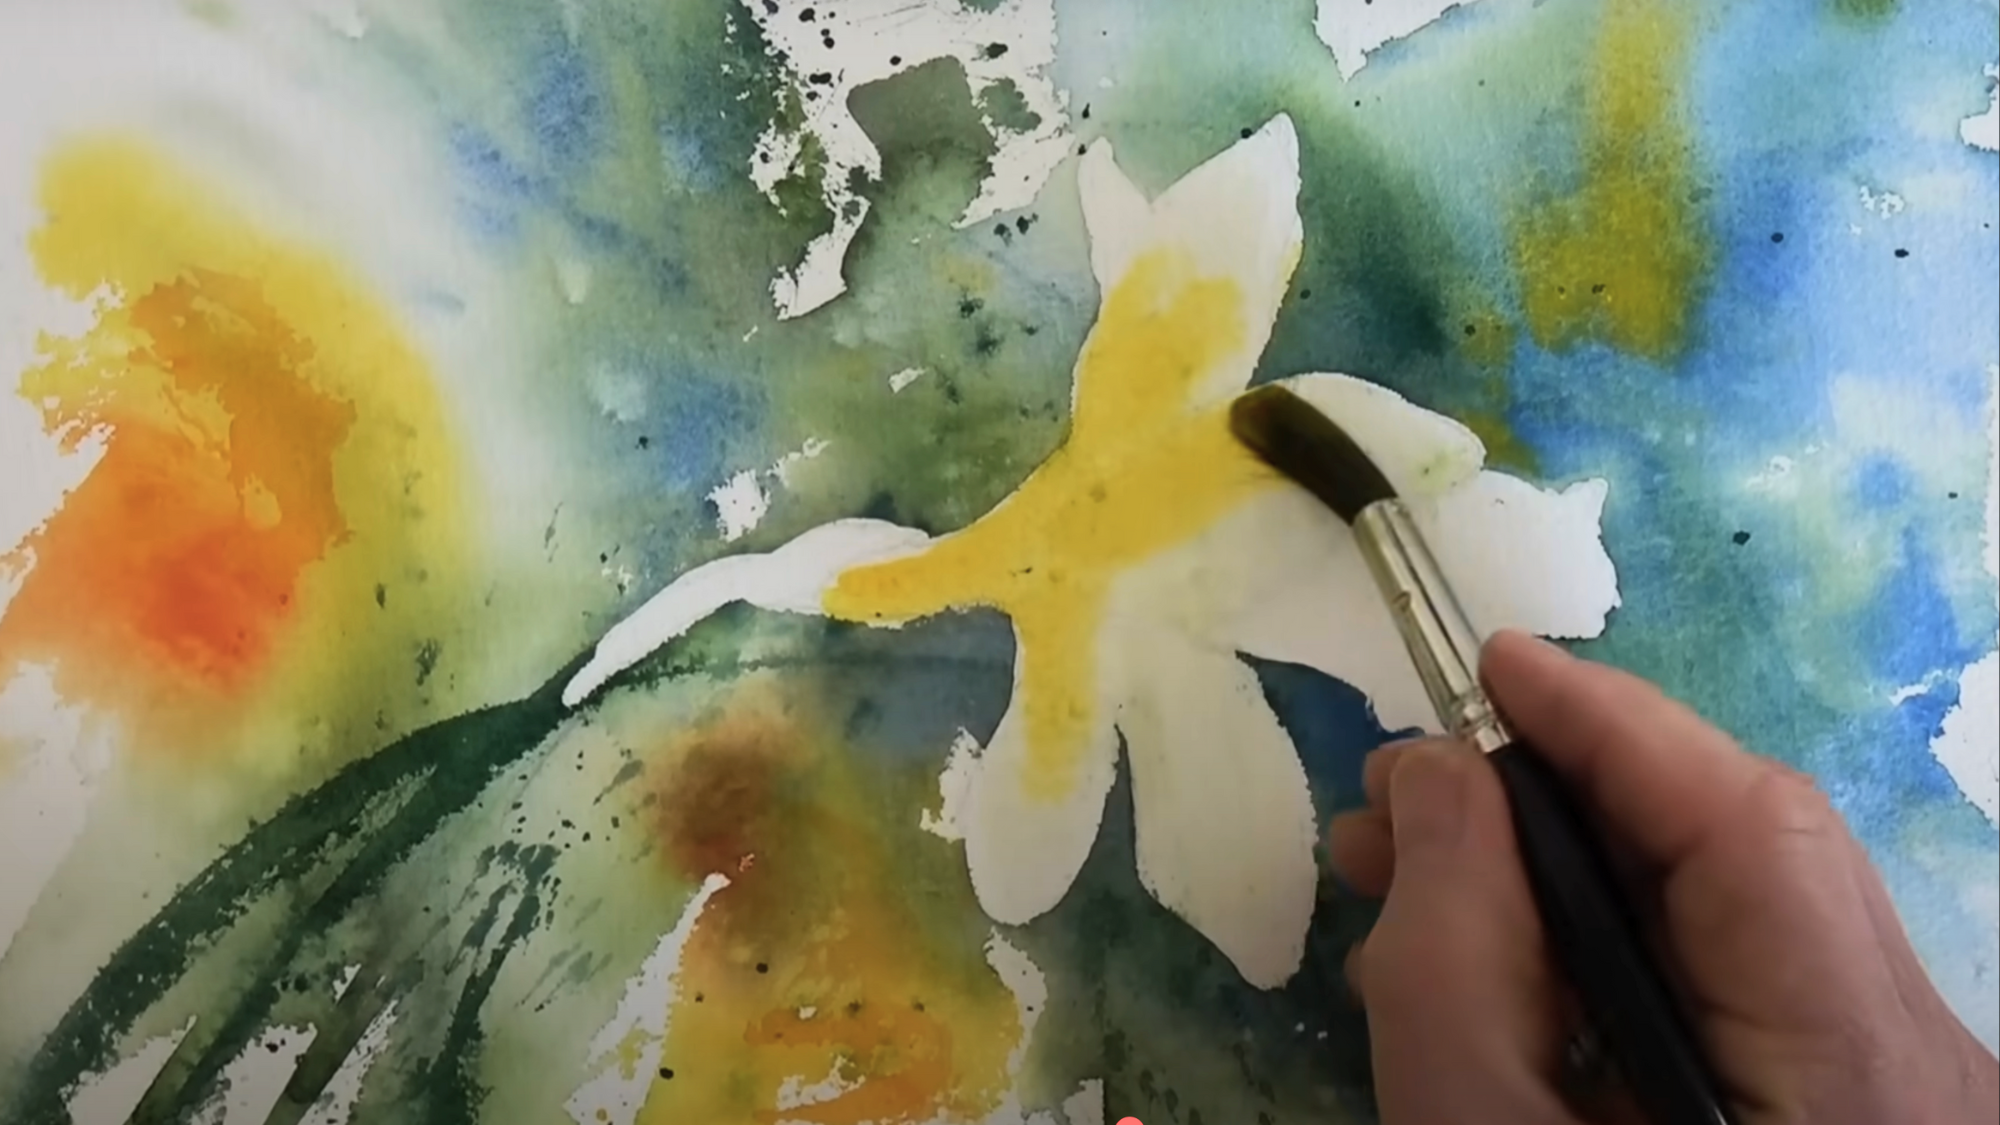
Begin detailing your watercolour daffodil by wetting the petal areas with clean water, but be sure to leave the trumpet (or corona) completely dry for now. This helps keep its form crisp and distinct from the rest of the bloom.
- Mix cadmium yellow into a rich, creamy consistency and apply it to the wet petals.
- Let the color naturally fade outward to mimic how light hits real daffodils.
- Drop in touches of cadmium orange to add warmth and subtle depth.
- For the ovary, use yellow ochre, then softly blend in burnt umber while still damp.
- Layer more yellow and ochre to shape gentle shadows and curves.
This step brings your
7. Final Touches and Softening the Edges
As your watercolour daffodil nears completion, take a step back and observe where it might need subtle refining.
Using a fine brush and a touch of burnt umber, gently add details in areas like the petal folds or where shadows naturally fall. Next, dip a tissue in clean water and lightly dab along any sharp or harsh edges. This helps blend colors flawlessly into one another, creating a more natural, organic feel.
Finally, sign your name using a soft orange tone in a quiet corner of the paper.
Pro Shading Tips for Lovely Watercolor Daffodils Art
Shading is the secret to bringing watercolor daffodils to life, adding depth, dimension, and a sense of light dancing on each petal. Even if you’re painting a single bloom or a colorful spring scene, these pro tips will help you amplify your artwork with soft, natural shading effects.
Let’s go into the techniques that make your daffodils truly glow.
- Start with light washes – Begin your watercolor daffodils with the palest yellow tones. This creates a base that allows for building depth gradually without making the painting look heavy.
- Use wet-on-wet technique – Apply paint to damp paper for soft edges where colors blend naturally. This works perfectly for the subtle petals of watercolor daffodils.
- Build layers patiently – Allow each layer to dry before adding more color. This creates the transparent effect that makes watercolors so appealing.
- Create shadows with complementary colors – Instead of using black, try a touch of purple or blue for shadows. This adds richness and depth to your painting.
- Save the whites – Plan ahead to preserve the paper’s white areas for highlights. These bright spots bring your flowers to life.
- Use a dry brush for texture – Once the main washes are dry, add texture to the trumpet part with a nearly dry brush for subtle details.
- Blend colors on your palette – Mix your yellows with tiny hints of orange or red to create varied tones that make your watercolor daffodils look three-dimensional and realistic.
- Practice value contrast – Make sure your painting has both very light and moderately dark areas to create visual interest and depth.
Creative Watercolor Daffodil Art Ideas for Spring Decor
Have you ever noticed how watercolor daffodils can brighten up your home when spring arrives? These sunny flowers make for gorgeous art projects that anyone can try.
Let me share some fun ways to use daffodil paintings in your spring decorations this year.
1. Daffodils in a Glass Jar
2. Spring Garden Scene
3. Minimalist Daffodil Line Art
4. Daffodil with Butterfly
5. Daffodils with Handwritten Quote
Key Takeaways
The joy of watching colors blend and flow brings a sense of calm that many find therapeutic. Remember that each
The lessons learned from painting these spring flowers transfer well to other subjects, too. As you continue practicing, you’ll develop your style and approach to watercolor daffodils.
The most important thing is to enjoy the process of creating, make mistakes, learn from them, and keep examining the gorgeous possibilities of watercolor painting.